![]()
Introduction
Have you ever wondered how many people today haven’t heard of artificial intelligence, machine learning, and other related concepts? If you’re involved in the tech field, you’re likely familiar with these terms.
From self-driving cars that detect objects to programs that recognize faces, computers are playing an increasingly important role in these areas. And Python, a popular programming language, is at the forefront of these advancements.
In this tutorial, I’ll guide you through creating a Machine Learning Project that uses your webcam to detect whether someone is wearing glasses. I’ll walk you through the process of creating this glass detection application using Python and we’ll accomplish this using a straightforward approach.
Requirements
Before you begin, you’ll need to meet some basic requirements:
- Ensure you have Python installed on your system. You can download it from: www.python.org
- pip (Python package installer)
Installation
We’ll need to install several Python libraries to complete this project. Open your terminal or command prompt and run the following commands one by one. If you’re using Linux, use pip3 instead of pip.
cmake
pip install cmake
dlib
Note: dlib is a C++ library, so installing cmake is necessary beforehand. The installation process for dlib may take around 15-20 minutes, so be patient.
pip install dlib
OpenCV-Python
OpenCV-Python is a Python wrapper for the original OpenCV library, which is written in C++. While Python is generally slower than C/C++, it allows us to leverage the power of OpenCV through Python code. This approach provides the benefits of both worlds: ease of use and performance.
pip install opencv-python
NumPy
NumPy is a fundamental library for scientific computing in Python. It provides efficient arrays, mathematical functions, and other tools essential for working with multidimensional data, which is common in tasks like image processing.
pip install numpy
Understanding the Glass Detection Program
Here’s a helpful tip: All glasses have a bridge connecting the two lenses. We can leverage this by building our program to capture a face and then focus on the area between the eyebrows, where the bridge typically sits. Here’s a breakdown of the steps involved:
- Capture a face: The program will use your webcam to capture video frames.
- Detect faces: We’ll use a pre-trained face detection model to identify any faces within the captured frame.
- Focus on the eyebrow region: For each detected face, we’ll focus on the area between the eyebrows.
- Apply image processing techniques: We’ll apply Gaussian blur and Canny edge detection to enhance the bridge of the glasses (if present) in the identified region. After applying the Canny edge detection filter, the image will be converted to black and white. In this format, white pixels (with a value of 255) represent the edges of objects in the frame.
- Analyze the edges: If the program detects specific edge patterns (indicating the bridge of glasses, represented by ‘255‘) in the processed image, it will display a message stating “Glass is present”. Otherwise, it will display “No glass”.
Coding the Project
Create a Python file named the file “glass_detection.py” and open it in a text editor or integrated development environment (IDE) of your choice.
Import necessary libraries
Start writing your Python script by importing the required libraries:
import dlib
import numpy as np
from threading import Thread
import cv2
import time
Declare dlib face detector
Declare a frontal face detector using dlib.
# Define the font for text rendering
font_1 = cv2.FONT_HERSHEY_SIMPLEX

# Declare the dlib frontal face detector
detector = dlib.get_frontal_face_detector()
Create a video stream class
Define a class called VideoStream to handle video streams from the webcam. This class captures frames in a separate thread for efficient processing.
class VideoStream:
    def __init__(self, stream):
        self.video = cv2.VideoCapture(stream)
        # Setting the FPS for the video stream
        self.video.set(cv2.CAP_PROP_FPS, 60)

        if self.video.isOpened() is False:
            print("Can't accessing the webcam stream.")
            exit(0)

        # Read the first frame from the video stream
        self.grabbed , self.frame = self.video.read()
        self.stopped = True
        # Create a thread for updating the video stream
        self.thread = Thread(target=self.update)
        # Set the thread as a daemon thread
        self.thread.daemon = True

    def start(self):
        self.stopped = False
        # Start the thread for updating the video stream
        self.thread.start()

    def update(self):
        while True :
            if self.stopped is True :
                break
            # Read the next frame from the video stream
            self.grabbed , self.frame = self.video.read()
        self.video.release()

    def read(self):
        # Return the current frame from the video stream
        return self.frame

    def stop(self):
        # Set the stopped flag to True, indicating that the video stream should stop
        self.stopped = True
Start capturing video frames
Use the VideoStream class to start capturing video from your webcam.
# Create a VideoStream object using the default camera stream (stream=0)
video_stream = VideoStream(stream=0)

# Start the video stream
video_stream.start()
Create an infinite loop
The program enters an infinite loop to continuously process video frames until you press the ‘q‘ key to quit.
# Run indefinitely until explicitly stopped
while True:
    # Check if the video stream has been stopped
    if video_stream.stopped is True:
        # Break the loop if the stream is stopped
        break
    else:
        # Read a frame from the video stream
        frame = video_stream.read()
        # Convert the frame to grayscale for processing
        gray = cv2.cvtColor(frame, cv2.COLOR_BGR2GRAY)

        # Detect faces in the grayscale frame
        rects = detector(gray, 1)
        # Iterate through each detected face
        for i, face_rect in enumerate(rects):
            # Extract coordinates of the detected face
            left = face_rect.left()
            top = face_rect.top()
            width = face_rect.right() - left
            height = face_rect.bottom() - top

            # Draw a rectangle around the detected face
            cv2.rectangle(frame, (left, top), (left+width, top+height), (0,255,0), 2)
            # Label the face with a number
            cv2.putText(frame, f"Face {i+1}", (left - 10, top - 10), font_1, 0.7, (0, 255, 0), 2, cv2.LINE_AA)

            # Crop the frame to focus on the detected face
            frame_crop = frame[top + 10:top+height-100, left + 30: left+width - 20]

            # Show the cropped frame
            cv2.imshow("Cropped Frame", frame_crop)

            # Smooth the cropped frame
            img_blur = cv2.GaussianBlur(np.array(frame_crop),(5,5), sigmaX=1.7, sigmaY=1.7)
            # Apply Canny edge detection to the cropped frame
            edges = cv2.Canny(image=img_blur, threshold1=100, threshold2=200)
            # Display the result of Canny edge detection
            cv2.imshow("Canny Filter", edges)

            # Extract the center strip of the edges
            edges_center = edges.T[(int(len(edges.T)/2))]
            # Check for the presence of white edges indicating glasses
            if 255 in edges_center:
                # Display message indicating presence of glasses
                cv2.rectangle(frame, (left, top+height), (left+width, top+height+40), (0,255,0), cv2.FILLED)
                cv2.putText(frame, "Glass is Present", (left+10, top+height+20), font_1, 0.65, (255, 255, 255), 2, cv2.LINE_AA)
            else:
                # Display message indicating absence of glasses
                cv2.rectangle(frame, (left, top+height), (left+width, top+height+40), (0,255,0), cv2.FILLED)
                cv2.putText(frame, "No Glass", (left+10, top+height+20), font_1, 0.65, (0, 0, 255), 2, cv2.LINE_AA)

        # Introduce a delay for processing each frame
        delay = 0.04
        time.sleep(delay)

    # Display the final result frame
    cv2.imshow("Result", frame)

    # Check for key press to stop the execution of the program
    key = cv2.waitKey(1)
    if key == ord('q'):
        break
Within the loop, the program performs the following steps for each captured frame:
- Convert the frame to grayscale.
- Detect faces using the ‘dlib‘ library.
- Draw a rectangle around each detected face.
- Crop the image around the detected face, focusing on the bridge area.
- Apply Gaussian Blur and Canny edge detection filters to the cropped image.
- Check for white edges in the processed image.
- Display a message indicating whether glasses were detected or not.
Stop capturing and close windows
Once you press the ‘q‘ key, the program stops capturing video and closes all open windows.
# Stop capturing video frames
video_stream.stop()

# closing all windows
cv2.destroyAllWindows()
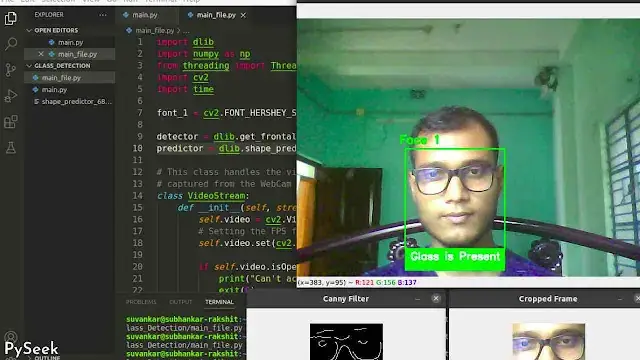
Output
Summary
In this tutorial, we explored how to develop a real-time glass detection application using Python and OpenCV. One piece of advice from me to you, please maintain a good quality of brightness before the face so that the program can detect a face accurately and give the answer correctly.
For more exciting Python projects, visit our dedicated Python Projects page, featuring tutorials on image manipulation, face recognition, and much more. Here are some examples to spark your interest:
- Build a Face Recognition Login System using Python
- Create an Image Compressor in Python using Tkinter
- Create a Tic Tac Toe Game in Python using Minimax Algorithm
- Create a Question Answering System in Python using NLP
If you have any questions or feedback, please leave a comment below.
Happy coding!