![]()

Introduction
In this article, we will develop a dynamic drawing application in Python using the Tkinter library. We will build this application with the following features in the menu bar:
- Brush Selection
- Brush Size Selection
- Eraser Selection
- Eraser Size Selection
- Multiple Color Selections for background and drawing as well
- Clear the Drawing
- Saving the image
We will cover the step-by-step implementation of each feature. These steps will give you insights into handling user input, incorporating graphics, and creating an interactive user interface. So, let’s get started!
Visit Also: Creating a Music Player in Python using VLC and Tkinter
Requirements
Before we begin, please ensure that you have the following prerequisites:
- Python is installed on your machine. You can download it from the official website www.python.org.
- A code editor or integrated development environment (IDE) such as Visual Studio Code, PyCharm, or IDLE.
- The Tkinter library which typically comes pre-installed with most Python distributions (If you don’t have it, install using this command: pip install tk).
- Install Pillow: pip install Pillow
The Source Code
Create a new directory for our drawing application project and set up the necessary files. Next open your favorite code editor or IDE and follow these steps:
- Create a new directory named “DrawingApp.”
- Inside the “DrawingApp” directory, create a new Python file called “drawing_app.py.”
Import the Required Libraries
Our drawing application will primarily rely on the Tkinter library, which provides an easy way to create graphical user interfaces (GUIs) in Python. Open the “drawing_app.py” file and import the necessary libraries as shown below:
import time
from tkinter import *
import tkinter as tk
from tkinter import filedialog
import PIL.ImageGrab as ImageGrab
from tkinter import colorchooser, messagebox
In the code above, we import the `tkinter` module and specifically import the `colorchooser` and `filedialog` submodules for color selection and file dialog functionality. The `ImageGrab` module from the Pillow library is for grabbing the screenshot of the selected portion (In our case, the canvas area).
Create the Drawing Application
Next, let’s create the main application window. Add the following code snippet to the “drawing_app.py” file:
window = Tk()
window.title("Drawing App")

def select_brush():
    pass

def change_brush_size(value):
    pass

def select_brush_size():
    pass

def select_eraser():
    pass

def select_eraser_size():
    pass

def select_brush_color():
    pass

def select_background_color():
    pass

def clear_canvas():
    pass

def save_image():
    pass

# Create the menu bar
menu_bar = Menu(window)

# Create the brush menu
brush_menu = Menu(menu_bar, tearoff=0)
brush_menu.add_command(label="Select Brush", command=select_brush)
brush_menu.add_command(label="Select Brush Size", command=select_brush_size)

# Create the eraser menu
eraser_menu = Menu(menu_bar, tearoff=0)
eraser_menu.add_command(label="Select Eraser", command=select_eraser)
eraser_menu.add_command(label="Select Eraser Size", command=select_eraser_size)

# Create the color menu
color_menu = Menu(menu_bar, tearoff=0)
color_menu.add_command(label="Select Drawing Color", command=select_brush_color)
color_menu.add_command(label="Select Background Color", command=select_background_color)

# Create the clear menu
clear_menu = Menu(menu_bar, tearoff=0)
clear_menu.add_command(label="Clear Canvas", command=clear_canvas)

# Create the save menu
save_menu = Menu(menu_bar, tearoff=0)
save_menu.add_command(label="Save Drawing", command=save_image)

# Add the menus to the menu bar
menu_bar.add_cascade(label="Brush", menu=brush_menu)
menu_bar.add_cascade(label="Eraser", menu=eraser_menu)
menu_bar.add_cascade(label="Color", menu=color_menu)
menu_bar.add_cascade(label="Clear", menu=clear_menu)
menu_bar.add_cascade(label="Save", menu=save_menu)

# Configure the menu bar
window.config(menu=menu_bar)

canvas = Canvas(window, width=800, height=480, bg="white")
canvas.pack()

window.mainloop()
In the above code, we create a new Tkinter window using `tk.Tk()` and set its title to “Drawing App” using `window.title()`.
We define several empty functions (`select_brush()`, `select_brush_size()`, `select_eraser()`, `select_eraser_size()`, `select_brush_color()`, `select_background_color()`, `clear_canvas()`, `save_image()`, `change_brush_size()` etc.) that will handle the functionality of each menu option. We will implement these functions later to add the desired features.
Next, we create the menu bar using `tk.Menu()` and define separate menus for brush size, color, and polygon, and save options using `tk.Menu()` as well. Each menu is populated with options using `menu.add_command()`. The `command` parameter specifies the function to be executed when the option is selected.
We then add the menus to the menu bar using `menu_bar.add_cascade()` and configure the window to display the menu bar using `window.config(menu=menu_bar)`.
Finally, we start the main event loop using `window.mainloop()` to handle user interactions and keep the application running.
Implement Menu Option Functionality
We already have set up the menu bar for our drawing application, let’s implement the functionality for each menu option. Modify the previously empty functions as follows:
Select Brush
To allow users to select the brush, we’ve introduced a feature called “Select Brush” in the “Brush” menu. Additionally, we have implemented an empty function to handle this functionality, in the previous section.
By default, the brush will remain selected, but it will be necessary to choose the brush again after performing an erasing operation. To incorporate this functionality, please include the following code within the `select_brush()` function.
def select_brush():
    global selected_color
    selected_color = previous_color
Brush Size Selection
To allow users to select different brush sizes, we can add a slider widget to the application window. Add the following code within the `select_brush_size()` function and define the `change_brush_size()` function just before it.
def change_brush_size(value):
    global brush_size
    brush_size = int(value)

def select_brush_size():
    new_window = Toplevel(window)
    new_window.title("Select Brush Size")
    new_window.geometry("400x100")

    brush_size_label = Label(new_window, text="Brush Size")
    brush_size_label.pack()

    brush_size_slider = Scale(new_window, from_=1, to=25,
    orient=HORIZONTAL, command=change_brush_size)
    brush_size_slider.set(brush_size)
    brush_size_slider.pack()
In the code above, we define the `change_brush_size()` function, which updates the `brush_size` variable based on the selected value from the slider.
We create a label widget (`brush_size_label`) to display the text “Brush Size” and a slider widget (`brush_size_slider`) using the `Scale` class from Tkinter. The slider ranges from 1 to 25, and its `command` parameter is set to `change_brush_size` to call the function whenever the slider value changes. We also set the initial value of the slider to the current `brush_size` variable.
Select Eraser
To implement the functionality of the “Select Eraser” in the “Eraser” menu, insert the following code within the `select_eraser()` function.
def select_eraser():
    global selected_color, previous_color
    previous_color = selected_color
    selected_color = background_color
Eraser Size Selection
As for the selection of brush size, the user should able to select the eraser size too. Update the `select_eraser_size()` function with the following code.
def select_eraser_size():
    new_window = Toplevel(window)
    new_window.title("Select Eraser Size")
    new_window.geometry("400x100")

    eraser_size_label = Label(new_window, text="Eraser Size")
    eraser_size_label.pack()

    eraser_size_slider = Scale(new_window, from_=1,
    to=20, orient=HORIZONTAL, command=change_brush_size)
    eraser_size_slider.set(brush_size)
    eraser_size_slider.pack()
Multiple Color Options
To allow users to select different colors for drawing, add the following code within the `select_brush_color()`. This enhancement will allow users to select multiple colors from the “Select Drawing Color” option within the “Color” menu.
def select_brush_color():
    global selected_color, previous_color
    color = colorchooser.askcolor(title="Select Color")[1]
    if color:
        selected_color = color
        previous_color = color
In the code above, we define the `select_brush_color()` function, which opens a color selection dialog using the `askcolor()` function from the `colorchooser` module. The selected color is stored in the `color` variable, and if a color is selected, it updates the `selected_color` variable.
Change Background Color
In addition to modifying the brush color, users can also alter the background color by utilizing the “Select Drawing Color” option located within the “Color” menu. Incorporate the following code into the `select_background_color()` function.
def select_background_color():
    global background_color, canvas
    color = colorchooser.askcolor(title="Select Color")[1]
    if color:
        background_color = color
        canvas.config(bg=background_color)
Clear the Canvas
There is an option for “Clear Canvas” in the “Clear” menu. To enhance this feature add the following code within `clear_canvas()` function.
def clear_canvas():
    canvas.delete("all")
Save Option
To provide the ability to save the drawn image, we have added an option “Save Drawing” within the “Save” menu. Now insert the following code into the `save_image()` function to enable the Save Option.
def save_image():
    file_path = filedialog.asksaveasfilename(defaultextension=".png")

    time.sleep(0.1)

    x1 = window.winfo_rootx() + canvas.winfo_x()
    y1 = window.winfo_rooty() + canvas.winfo_x()

    x2 = x1 + canvas.winfo_width()
    y2 = y1 + canvas.winfo_height()

    if file_path:
        canvas.postscript(file=file_path, colormode='color')
        # Format: crop(left, top, right, bottom)
        ImageGrab.grab().crop((x1, y1, x2, y2)).save(file_path)
In the code above, we define the `save_image()` function, which opens a file dialog using the `asksaveasfilename()` function from the `filedialog` module. It saves the canvas content as a PostScript file using the `postscript()` method, and if a file path is selected, it captures the screenshot of the canvas area and saves it as an image.
Implement Drawing Functionality
To enable drawing on the canvas, we need to handle user input and update the canvas accordingly. Add the following code just below the previous code snippet:
# Default Values
is_drawing = False
last_x = 0
last_y = 0
brush_size = 2
selected_color = "black"
previous_color = "black"
background_color = "white"

def start_drawing(event):
    global is_drawing, last_x, last_y
    is_drawing = True
    last_x = event.x
    last_y = event.y

def draw(event):
    global is_drawing, last_x, last_y
    if is_drawing:
        x, y = event.x, event.y
        canvas.create_line(last_x, last_y, x, y,
        width=brush_size, fill=selected_color)
        last_x = x
        last_y = y

def stop_drawing(event):
    global is_drawing
    is_drawing = False

def erase_drawing():
    global selected_color
    selected_color = "white"
In the code above, we define several functions to handle the drawing functionality. The `start_drawing()` function is triggered when the user presses the left mouse button on the canvas. It sets the `is_drawing` flag to `True` and stores the initial coordinates of the mouse cursor.
The `draw()` function is bound to the `<B1-Motion>` event, which allows continuous drawing as the user moves the mouse. It retrieves the current coordinates of the mouse cursor (`event.x` and `event.y`) and creates a line on the canvas using the `create_line()` method. The `last_x` and `last_y` variables keep track of the previous position for smooth drawing.
The `stop_drawing()` function is triggered when the user releases the left mouse button. It sets the `is_drawing` flag to `False`, indicating that the drawing action has stopped.
Bind Event Handlers
Finally, add the following code before the main event loop (`window.mainloop()`) to bind the event handlers to specific events on the canvas widget.
canvas.bind('<Button-1>', start_drawing)
canvas.bind('<B1-Motion>', draw)
canvas.bind('<ButtonRelease-1>', stop_drawing)
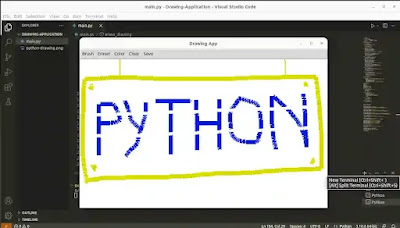
Output
Here is the screenshot of our beautiful drawing application.
Visit Also: Create a Language Translator App in Python using Tkinter
Summary
In this tutorial, we built a drawing application with advanced features using Python and Tkinter. We learned how to create a canvas, handle user input, implement drawing functionality, and incorporate additional features such as brush size selection, multiple color options, and a save option.
This was a foundation project. Using this knowledge, you can create more complex drawing applications or explore other areas of Python development.
For any queries, reach out to me at contact@pyseek.com.
Happy drawing!