![]()
Introduction
In today’s digital age, images play a crucial role in various applications, from websites to mobile apps. However, large image file sizes can significantly impact loading times and consume excessive storage space. Image compression techniques come to the rescue by reducing file sizes without compromising image quality.
In this tutorial, we’ll walk through creating an Image Compressor in Python using Tkinter, and Pillow libraries. This application helps you reduce the size of any image while maintaining reasonable quality.
The key feature of this application is the Adjustable Compression Level. It means you can choose the desired quality for the compressed image using a drop-down menu. Lower quality results in a smaller file size.
👉Recommended Article: How to Compress an Image using Python: A Detailed Guide
Requirements
Before we begin, ensure you have Pillow (Here is the Documentation) installed. Open your terminal or command prompt and run:
pip install Pillow
Most importantly we need the Tkinter library to design a beautiful graphical interface but don’t worry; it’s pre-installed with Python! You also need a basic understanding of Python programming concepts (To learn Python, visit this page: Python Tutorials).
How to Use the Application
The user interface is straightforward (see image below). Follow these steps:
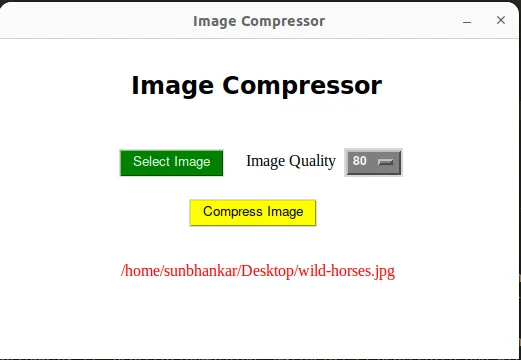
- Select Image: Click the “Select Image” button to choose an image.
- Choose Image Quality: Select the desired quality level for the compressed image.
- Compress Image: Click the “Compress Image” button to initiate the compression process.
- Save Result: Specify the destination folder to save the compressed image.
Source Code
The following code outlines the implementation of the Image Compressor application:
import os
import PIL.Image
from tkinter import *
from tkinter import filedialog
from tkinter import messagebox

# The Compressor class
class Compressor:
    def __init__(self, root):
        self.window = root
        self.window.geometry("520x320")
        self.window.title("Image Compressor")
        self.window.configure(bg="white")
        self.window.resizable(width=False, height=False)

        # Setting the image path Null initially
        self.imagePath = ''

        # Header Label
        headingLabel = Label(self.window, text="Image Compressor",
        font=("Kokila", 18, "bold"), bg="white")
        headingLabel.place(x=130, y=30)

        # Button to select the Image
        selectButton = Button(self.window, text="Select Image",
        font=("Helvetica", 10), bg="green", fg="white", command=self.Open_Image)
        selectButton.place(x=120, y=110)

        # Label for Image Quality
        imageQuality = Label(self.window, text="Image Quality",
        font=("Times New Roman", 12), bg="white")
        imageQuality.place(x=245, y=110)

        # Image quality options
        imageQualityList = [10, 20, 30, 40, 50, 60, 70, 80]

        # Dropdown menu for image quality
        self.clicked = StringVar()
        self.clicked.set(80)
        qualityMenu = OptionMenu(self.window, self.clicked, *imageQualityList)
        qualityMenu.config(width=2, font=("Helvetica", 9, "bold"), bg="gray50", fg="white")
        qualityMenu.place(x=345, y=109)

        # Button to compress the selected image
        compressButton = Button(self.window, text="Compress Image",
        font=("Helvetica", 10), bg="yellow", fg="black", command=self.Compress_Image)
        compressButton.place(x=190, y=160)

        # Frame to display selected image path
        self.frame = Frame(self.window, bg="white", width=520, height=100)
        self.frame.place(x=0, y=200)

    # Open an Image through the filedialog widget
    def Open_Image(self):
        self.imagePath = filedialog.askopenfilename(initialdir="/",
        title="Select an Image", filetypes=(("Image files", "*.jpg *.jpeg *.png"),))

        # Display selected image path
        if len(self.imagePath) != 0:
            imagePathLabel = Label(self.frame, text=self.imagePath,
            font=("Times new roman", 12), bg="white", fg="red")
            imagePathLabel.place(x=260-(len(self.imagePath)/2)*7, y=20)

    # Function to Compress the chosen image
    def Compress_Image(self):
        if len(self.imagePath) == 0:
            messagebox.showerror("Error", "Please Select an Image first")
        else:
            img = PIL.Image.open(self.imagePath)
            width, height = img.size
            img = img.resize((width, height), PIL.Image.ANTIALIAS)
            filename, extension = os.path.splitext(os.path.basename(self.imagePath))
            savetoPath = filedialog.askdirectory()
            resultFilename = f"{savetoPath}/{filename}-compressed.jpg"

            try:
                img = img.convert("RGB")
                img.save(resultFilename, quality=int(self.clicked.get()), optimize=True)
                messagebox.showinfo("Done!", "The Image has been compressed.")
                self.reset()

            except Exception as es:
                messagebox.showerror("Error", f"Error due to {es}")

    # Reset function
    def reset(self):
        for widget in self.frame.winfo_children():
            widget.destroy()
        self.imagePath = ''

# Main function
if __name__ == "__main__":
    root = Tk()
    obj = Compressor(root)
    root.mainloop()
Output
Watch the video to see how the Image Compressor works:
Summary
In this tutorial, we’ve built an Image Compressor in Python using Tkinter and Pillow libraries. You can effortlessly compress images without any quality loss, with the added flexibility of selecting compression levels.
Explore this Python Image Compressor Tool, compress your images with different quality levels, and experience its efficiency firsthand. To discover more lovely Tkinter examples, visit our dedicated Python Projects page. Below are a few examples to spark your interest:
- Create a Meditation App in Python with Tkinter
- Create a Multiple Files Renamer in Python with Tkinter
- Build a Face Recognition Login System using Python
- Create an Alarm Clock using Python with Tkinter
Feel free to leave your feedback and queries in the comments section.
Happy Compressing!