![]()
Introduction
Ever scrolled through endless YouTube playlists, wishing you could capture your favourite videos and audios for offline binging? In the age of digital content overload, where internet access isn’t always a given, that yearning is real. Fear not, tech enthusiasts! Building your own YouTube video and audio downloader with Python is not just possible, it’s actually within reach.
This article will guide you through the process of creating a simple yet powerful YouTube Downloader in Python using the Tkinter and PyTube libraries. Forget bland command line interfaces – we’ll add a sleek user interface for an intuitive and visually appealing experience. So, ditch the buffering woes and download freedom. Let’s dive into the code!
Read More: Create a Meditation App in Python with Tkinter
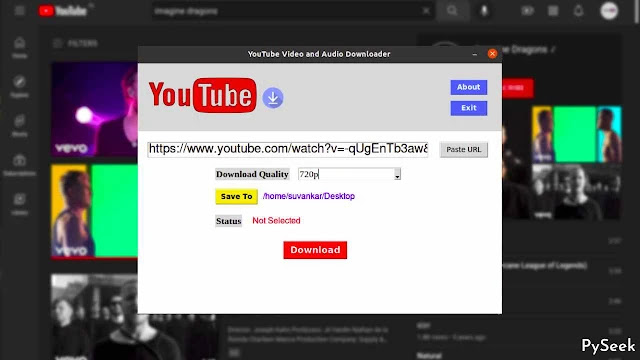
Guide to Operating the YouTube Downloader
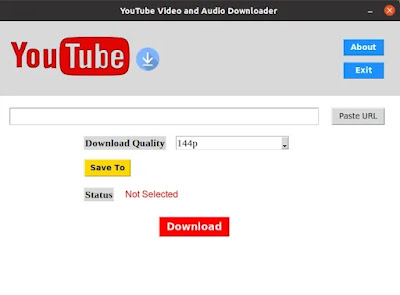
Our YouTube Downloader application offers a beautiful user interface that is easy to use. It shows YouTube Logo at the top and along with a download sign, makes the application more realistic. Not only videos, but you can download audios also using this YouTube Downloader. So, are you ready to dive in? Here’s how it works:
- Launch the Application.
- Enter (or Press the ‘Paste URL’ button) the YouTube URL of the video or audio you want to download in the entry field.
- Choose the desired download quality.
- Select a location on your device to save the downloaded file.
- Click the ‘Download’ button.
- Wait for the download to complete. A success message will be displayed upon successful download, and any errors will be shown in case of issues.
Requirements and Installations
Before we embark on our YouTube Downloader quest, let’s gather our essential tools and resources:
Python 3
This is our trusty programming language, ready to bring our downloader to life. Grab it here if you haven’t already: https://www.python.org/
Required Libraries
- Pillow:
pip install Pillow - PyTube:
pip install pytube - pyperclip:
pip install pyperclip - Tkinter:
pip install tk
Python Basics
If you’re new to Python, don’t worry! Check out these helpful tutorials to get you started: Python Tutorials: Python Tutorials.
Code Editor
Choose your code editor (like Visual Studio Code or PyCharm) to write and edit our code with ease.
Setting Up the Project
Create a folder named ‘Yt-Downloader‘. Afterward, establish one additional sub-directory within this folder with the title ‘Images’. Get the required image files from here (‘YouTube.png‘, ‘Download_Button.png‘). Subsequently, place these files into the ‘Images’ folder.
Crafting the YouTube Downloader
Get Ready to Code Your Own YouTube Downloader using Python programming language. Here, we’ll Utilize the friendly tkinter library to design a user-friendly interface and the reliable pytube library for smooth video and audio downloads. Let’s kick off this coding journey together!
Import Necessary Modules
Within the ‘Yt-Downloader‘ directory, generate a Python file named “downloader.py” and start by importing the required modules:
import pyperclip
from tkinter import *
from threading import *
from tkinter import ttk
from pytube import YouTube
from PIL import ImageTk, Image
from tkinter import filedialog
from tkinter import messagebox, ttk
Video Resolutions and Audio Selection
Create a Python list that includes available download quality options with different video resolutions, including the choice to include audio.
# Resolution Options(Audio Option is also available)
download_quality = ['144p', '360p', '720p', 'Audio Only']
Define the YouTube Downloader Class
Create a class and give it the name `Yt_Downloader`.
class Yt_Downloader:Create the Main Application Window
The `__init__` method will create the main application window for us. Here, we specify the window size, title, resizable option, etc.
    def __init__(self, root):
        # Setting the Tkinter main window
        self.window = root
        self.window.geometry("700x480")
        self.window.title('YouTube Video and Audio Downloader')
        self.window.resizable(width = False, height = False)

        self.save_to_loc = ''

        # Frame 1: For YouTube Logo
        self.frame_1 = Frame(self.window, width=220, height=80)
        self.frame_1.pack()
        self.frame_1.place(x=20, y=20)

        # Frame 2: For Download Logo
        self.frame_2 = Frame(self.window, width=50, height=50)
        self.frame_2.pack()
        self.frame_2.place(x=235, y=40)

        self.show_yt_logo()
        self.show_dn_logo()

        # About Button
        about_btn = Button(self.window, text="About", \
        font=("Kokila", 10, 'bold'), bg="dodger blue", \
        fg="white", width=5, command=self.About_Window)
        about_btn.place(x=600, y=30)

        # Exit Button
        exit_btn = Button(self.window, text="Exit", \
        font=("Kokila", 10, 'bold'), bg="dodger blue", \
        fg="white", width=5, command=self.Exit_Window)
        exit_btn.place(x=600, y=70)

        # Frame 3: For the Main Page Widgets
        self.frame_3 = Frame(self.window,bg="white",\
        width=700,height=480)
        self.frame_3.place(x=0, y=130)

        # Calling the Main_Window() Function
        self.Main_Window()
Set the YouTube Logo
We can set a YouTube logo for our application to enhance its appearance.
    # This function displays the YouTube Logo
    def show_yt_logo(self):
        # Opening the YouTube logo image
        image = Image.open('Images/YouTube_logo.png')
        # Resizing the image
        resized_image = image.resize((220, 80))

        # Create an object of tkinter ImageTk
        self.img_1 = ImageTk.PhotoImage(resized_image)

        # Create a Label Widget to display the text or Image
        label = Label(self.frame_1, image=self.img_1)
        label.pack()
The image path is specified within the `Image.open` function. The image file needs to exist at that location.
Set the Download Logo
We should include an additional logo, the Download logo, in our application to signify its purpose of downloading YouTube content.
    # This Function displays the Download logo
    def show_dn_logo(self):
        # The image Path(Opening the image)
        image = Image.open('Images/Download_Button.png')
        resized_image = image.resize((50, 50))

        # Create an object of tkinter ImageTk
        self.img_2 = ImageTk.PhotoImage(resized_image)

        # Create a Label Widget to display the text or Image
        label = Label(self.frame_2, image=self.img_2)
        label.pack()
Create the Main Window
Next, create a different method called `Main_Window`. This method will display all the elements associated with downloading videos and audio from YouTube.
For example, it will include the Entry Box (for pasting the copied URL), the ‘Paste URL’ Button, the ‘Save To’ Button (for selecting the directory where the downloaded file will be stored), a Status Label (to display the current status, which could be ‘Not Selected,’ ‘Downloading…,’ or ‘Download Completed’), and lastly, the ‘Download’ button.
    # This function displays all the widgets in the Main Page
    def Main_Window(self):
        self.URL = Entry(self.frame_3, \
        font=("Helvetica", 18), width=41)
        self.URL.place(x=20,y=20)

        # Paste URL Button
        paste_btn = Button(self.frame_3, text="Paste URL", \
        command=self.Paste_URL)
        paste_btn.place(x=580,y=20)

        # Resolution Label
        resolution_lbl = Label(self.frame_3, \
        text="Download Quality", \
        font=("Times New Roman", 13, 'bold'))
        resolution_lbl.place(x=150, y=70)

        self.quality = StringVar()
        # Combo Box for showing the available video resolution
        # and  Audio download options
        self.quality_combobox = ttk.Combobox(self.frame_3, \
        textvariable=self.quality, font=("times new roman",13))
        self.quality_combobox['values'] = download_quality
        self.quality_combobox.current(0)
        self.quality_combobox.place(x=310,y=70)

        # Save To Button: Where the downloaded file will be stored
        save_to_btn = Button(self.frame_3, text="Save To", \
        font=("Kokila", 10, 'bold'), bg="gold", width=6, \
        command=self.Select_Directory)
        save_to_btn.place(x=150, y=110)

        # Tkinter Label sor showing the Save To location path
        # on the window
        self.loc_label = Label(self.frame_3, \
        text=self.save_to_loc, font=("Helvetica", 12), \
        fg='blue', bg='white')
        self.loc_label.place(x=240, y=116)

        status_lbl = Label(self.frame_3, text="Status", \
        font=("Times New Roman", 13, 'bold'))
        status_lbl.place(x=150, y=160)

        # Status Label:
        # Options: 'Not Slected(By Default), or 'Downloading...',
        # or 'Download Completed''
        self.status = Label(self.frame_3, text="Not Selected", \
        font=("Helvetica", 12), bg="white", fg="red")
        self.status.place(x=220, y=163)

        download_btn = Button(self.frame_3, text="Download", \
        font=("Kokila", 13, 'bold'), bg="red", fg="white", \
        width=8, command=self.Threading)
        download_btn.place(x=280, y=210)
Paste the Copied URL
The `Paste_URL` method retrieves the URL copied to the clipboard and inserts it into the Entry Box, utilising the Python `pyperclip` module.
    # When the 'Paste URL' button is pressed, this function
    # gets a call and paste the pre-copied text(URL) in the
    # Tkinter Entry Box
    def Paste_URL(self):
        exact_URL = StringVar()
        self.URL.config(textvariable=exact_URL)
        exact_URL.set(str(pyperclip.paste()))
Select the Saving Location
Now, implement a method called `Select_Directory` to get the selected storage location from the users.
    # This function opens the Tkinter file dialog to
    # let users select the save to location for the Yt video
    def Select_Directory(self):
        # Storing the 'saving location' for the result file
        self.save_to_loc = filedialog.askdirectory(title = "Select a location")
        self.loc_label.config(text=self.save_to_loc)
Handling Download Events
Now, before we create the `Download` method, let’s introduce another method called `Threading`. This method will spawn a separate thread using Python’s `threading` module to invoke the `Download` method.
Employing this method will provide the application with enhanced operational flexibility. For example, it will enable concurrent execution of GUI-related tasks and the downloading process, ensuring smooth parallel operation.
    # Creating a different thread to run the 'Download' function
    def Threading(self):
        # Killing a thread through "daemon=True" isn't a good idea
        self.x = Thread(target=self.Download, daemon=True)
        self.x.start()

    def Download(self):
        # If the user doesn't enter any URL, a warning messagebox
        # will popped up
        if self.URL.get() == '':
            messagebox.showwarning('Warning!', \
            "Please Enter a Valid URL")
        else:
            try:
                yt = YouTube(self.URL.get())
                # If the user selects 'Audio Only' option
                # from the combo box(Download the Audio)
                if self.quality_combobox.get() == 'Audio Only':
                    self.status.config(text="Downloading...")
                    audio = yt.streams.filter(type="audio").last()
                    audio.download(output_path=self.save_to_loc)
                # If the user selects any video resolution from
                # the combo box
                else:
                    self.status.config(text="Downloading...")
                    video = yt.streams.filter(mime_type="video/mp4",\
                    res=self.quality_combobox.get(), progressive=True).first()
                    video.download(output_path=self.save_to_loc)

                self.status.config(text="Download Completed")
            except Exception as es:
                messagebox.showerror("Error!", f"Error due to {es}")
About and Exit Methods
We’ve set up ‘About‘ and ‘Exit‘ buttons in the application’s header section. Let’s create two corresponding methods for these buttons.
    # When the 'About' button is pressed, this function gets a call
    def About_Window(self):
        messagebox.showinfo("Yt Downloader 22.05",\
        "Developed by Subhankar Rakshit\n~PySeek")

    # This function closes the main window
    def Exit_Window(self):
        self.window.destroy()
Initializing the Application
In the main part of your code, create an instance of the `Yt_Downloader` class to build the GUI, and then start the main loop.
# The main function
if __name__ == "__main__":
    root = Tk()
    # Creating a 'Yt_Downloader' class object
    obj = Yt_Downloader(root)
    root.mainloop()
In this block of code, we check if the script is being run as the main program (`__name__ == “__main__”`). This ensures that the code inside this block only runs when the script is executed, not when it’s imported as a module.
Output
Ready to see your YouTube Downloader App in action? Dive into the full video and witness its superpowers firsthand!
Conclusion
Congratulations! You have successfully created a YouTube Downloader in Python using the Tkinter library. Not only videos, this YouTube Downloader also offers to download audios from YouTube. By structuring your project using class, you have made the code more organised and maintainable.
This project not only allows you to download YouTube content but also demonstrates the power of Python for creating user-friendly applications. The use of this application is as easy as 1-2-3-4. So, why late? Try this app now to start downloading your favorite content from YouTube.
And hey, no coder is left behind! If you have any questions, feel free to ask. The coding community is always happy to lend a helping hand.
For more Tkinter inspiration, explore our dedicated page brimming with exciting Python Projects. It’s a treasure trove of possibilities waiting to be unleashed!
Happy Downloading!