![]()
Introduction
Ever lost yourself in a sea of cryptic filenames, desperately hunting for that one picture from last weekend’s trip? Whatsapp Web throws this frustration at us all too often, with its nearly identical names for downloads. But worry no more! I’ve built a Python tool to tame your chaotic folders with just one click.
In this tutorial, you’ll learn how to create a Multiple Files Renamer in Python using the Tkinter library. This Python file renamer lets you rename any file extension in a folder. Designed for beginners of all levels, it’s like a magic wand for tidying your digital world. No more confusing code – just point, click, and say goodbye to filename frustration!
Features of the Application
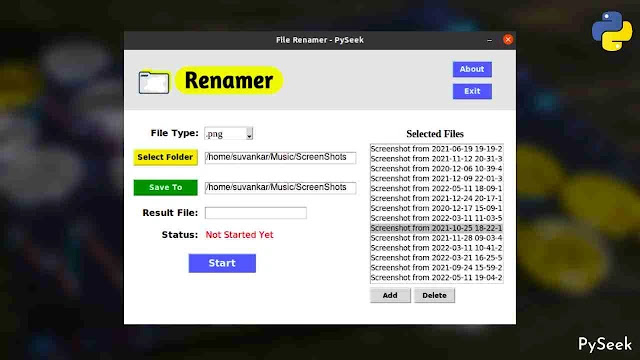
Our bulk file renamer application offers a beautiful, easy-to-use interface. It packs a punch with these user-friendly features:
- File Type Selection: Easily choose the file type you want to rename.
- Folder Selection: Select the directory containing the files you wish to rename.
- Save to Location: Specify the destination folder where the renamed files will be stored.
- Common Naming Convention: Simplify file names by selecting a common base name. For instance, if you choose “my_image” for image files, the tool will automatically rename them in a sequential order, such as “my_image0,” “my_image1,” “my_image2,” and so forth.
- File Name List: A listbox displays all available file names within the selected folder. This feature not only allows you to view existing names but also enables you to add more files to the list and delete any unwanted entries.
Requirements and Installations
If Python isn’t already a resident on your system, fear not! Grab the latest version from their website (https://www.python.org/). Once settled, remember to install the Pillow library using the command below.
pip install PillowMost importantly we need the Tkinter library to design a beautiful graphical interface but don’t worry; it’s pre-installed with Python!
Setting Up the Project
Before we unleash our Python Countdown Timer, let’s get our workspace organized:
- Create a separate folder for this Python project named “FileRenamer”.
- Establish one additional sub-directory within this folder with the title ‘Images’.
- Within the main folder, declare a Python file named
file_renamer.py - Get the required image file from here (‘File_Renamer.png‘) and place it into the ‘Images’ folder.
Now your project is primed for coding adventures.
Import the modules
Let’s start writing your code by importing these modules.
import os
import glob
from tkinter import *
from threading import *
from PIL import ImageTk, Image
from tkinter import messagebox, ttk, filedialog
Available File Extensions
Create a Python list that will hold the available file extensions for users to select. You can modify it as you desire.
# File Extensions: You can modify it as per your requirements
file_types = ['.jpg', 'jpeg', '.png', '.mp3', '.mp4', '.pdf']
Define the ‘FileRenamer’ class
Now we’ll create a class named FileRenamer. It will act as a container for our file renamer’s features and behaviors.
class File_Renamer:Create the Main Application Window
The __init__ method will create the main application window for us. Within this method, we define the window dimensions, title, resizable preferences, and all components essential for configuring the bulk File Renamer, such as labels, buttons, and combo boxes.
    def __init__(self, root):
        # Setting the Tkinter main window
        self.window = root
        self.window.geometry("720x500")
        self.window.title('File Renamer - PySeek')
        self.window.resizable(width = False, height = False)
        self.window.configure(bg='gray90')

        # Declaring some variables
        self.Selected_Folder = ''
        self.SaveTo_Loc = ''
        self.File_List = list()
        # Python Dictionary to store the file name corresponding
        # with the file path
        self.File_Dict = dict()

        # Frame 1: For the Logo
        self.frame_1 = Frame(self.window,bg='gray90',\
        width=280, height=70)
        self.frame_1.pack()
        self.frame_1.place(x=20, y=20)

        # Calling the function to display the logo
        self.Display_Logo()

        # About Button
        About_Btn = Button(self.window, text="About", \
        font=("Kokila", 10, 'bold'), bg="dodger blue", \
        fg="white", width=5, command=self.About_Window)
        About_Btn.place(x=600, y=20)

        # Exit Button
        Exit_Btn = Button(self.window, text="Exit", \
        font=("Kokila", 10, 'bold'), bg="dodger blue", \
        fg="white", width=5, command=self.Exit_Window)
        Exit_Btn.place(x=600, y=60)

        # Frame 2: For the Main Window Widgets
        self.frame_2 = Frame(self.window, bg="white",\
        width=720,height=480)
        self.frame_2.place(x=0, y=110)

        # Calling the function to display main window widgets
        self.Main_Window()
Display the Logo
To enhance the visual appeal of our Renamer application, we’re planning to include a logo in the top-left corner. I’ve already provided the image file above. If you haven’t received it yet, please make sure to download it first, as we’ll be referencing the image path in the Display_Logo method.
    # This function displays the File Renamer Logo
    def Display_Logo(self):
        # Opening the logo image
        image = Image.open('Images/File_Renamer.png')
        # Resizing the image
        resized_image = image.resize((280, 70))
        # Create an object of tkinter ImageTk
        self.img_1 = ImageTk.PhotoImage(resized_image)
        # Create a Label Widget to display the text or Image
        label = Label(self.frame_1, bg='gray90',image=self.img_1)
        label.pack()
Add Widgets to the Main Window
Let’s create a method called Main_Window to incorporate all the necessary elements into our File Renamer application. To begin, we’ll include a Tkinter combobox to display the available file extensions.
    # This function displays all the widgets in the 'self.frame_2'
    # related to File Renaming Operation
    def Main_Window(self):
        Filetype_Label = Label(self.frame_2, text="File Type: ", \
        font=("Kokila", 12, 'bold'), bg='white')
        Filetype_Label.place(x=50, y=30)

        self.f_type = StringVar()
        # Combo Box for showing the file extensions
        self.File_Type = ttk.Combobox(self.frame_2, \
        textvariable=self.f_type, font=("times new roman",13),width=8)
        self.File_Type['values'] = file_types
        self.File_Type.current(0)
        self.File_Type.place(x=150,y=30)
Next, add a button labeled ‘Select Folder’ that utilizes Tkinter filedialog for choosing a folder. Also, include a Tkinter entry widget to showcase the selected folder path. What’s interesting is that you can either select the folder using the ‘Select Folder’ button or manually enter the folder path in the entry box.
        # Button for selecting the directory (where
        # the desired files are presented)
        Folder_Button = Button(self.frame_2, text="Select Folder", \
        font=("Kokila", 10, 'bold'), bg="gold", width=10, \
        command=self.Select_Directory)
        Folder_Button.place(x=20, y=70)

        self.Folder_Entry = Entry(self.frame_2, \
        font=("Helvetica", 12), width=30)
        self.Folder_Entry.place(x=150, y=75)
Now, introduce another button and entry widget for choosing the ‘Save To’ location, following the same approach as before.
        SaveTo_Button = Button(self.frame_2, text="Save To", \
        font=("Kokila", 10, 'bold'), bg="green", fg='white', \
        width=10, command=self.SaveTo_Directory)
        SaveTo_Button.place(x=20, y=125)

        self.SaveTo_Entry = Entry(self.frame_2, \
        font=("Helvetica", 12), width=30)
        self.SaveTo_Entry.place(x=150, y=130)
Create an entry widget for specifying a common base name for all renamed files. If the user leaves it blank, our Multiple File Renamer tool will automatically apply sequential numbers to the file names, such as ‘0.ext’, ‘1.ext’, ‘2.ext’, and so on (where ‘ext’ refers to the extension).
        ResultFile_Label = Label(self.frame_2, \
        text="Result File: ", font=("Kokila", 12, 'bold'), bg='white')
        ResultFile_Label.place(x=35, y=175)

        self.ResultFile_Entry = Entry(self.frame_2, \
        font=("Helvetica", 12))
        self.ResultFile_Entry.place(x=150, y=175)
Let’s include a status label to reflect the current status of the renaming operation, displaying messages like ‘Not Started Yet,’ ‘Renaming…’, or ‘Renaming Completed’.
        Status = Label(self.frame_2, text="Status: ", \
        font=("Kokila", 12, 'bold'), bg='white')
        Status.place(x=70, y=215)

        self.Status_Label = Label(self.frame_2, text="Not Started Yet", \
        font=("Kokila", 12), bg="white", fg="red")
        self.Status_Label.place(x=150, y=215)
Here comes the most interesting feature: displaying available file names within the selected directory and allowing modifications. To achieve this, use a Tkinter list box and add the ‘Add’ and ‘Delete’ buttons for appending files to the list or removing them.
        # ListBox Label
        Listbox_Label = Label(self.frame_2, text="Selected Files", \
        font=("Times New Roman", 14, 'bold'), bg='white')
        Listbox_Label.place(x=515, y=30)

        # Listbox for showing the selected files for renaming
        self.File_ListBox = Listbox(self.frame_2,width=30, height=14)
        self.File_ListBox.place(x=450, y=60)

        Add_Button = Button(self.frame_2, text='Add', \
        font=("Kokila", 9, 'bold'), width=6, command=self.Add_File)
        Add_Button.place(x=450, y=322)

        Delete_Button = Button(self.frame_2, text='Delete', \
        font=("Kokila", 9, 'bold'), width=6, command=self.Delete_File)
        Delete_Button.place(x=530, y=322)
We’re almost finished organizing our Renaming Application. Just one task remains. Let’s wrap things up by adding the ‘Start’ button to initiate the multiple files renaming operation.
        Start_Button = Button(self.frame_2, text="Start", \
        font=("Kokila", 13, 'bold'), bg="dodger blue", fg="white", \
        width=8, command=self.Threading)
        Start_Button.place(x=120, y=260)
Prepare the Widgets for Action
We’ve accomplished the design of the user interface for our Python File Renamer tool and integrated various tkinter widgets. Now it’s time to bring those widgets to life!
In this section, we’ll develop specific methods for each widget to ensure their proper functionality. We’ll focus on techniques for:
- Selecting the target folder.
- Choosing the desired ‘Save To’ location for renamed files.
- Picking a base name to streamline the renaming process.
- Inserting available files within the listbox for easy viewing.
- Adding additional files to the listbox as needed.
- Removing files from the listbox to refine the selection.
- Creating a separate thread to perform the renaming operation.
- Clearing the listbox efficiently for a fresh start.
Select the Folder
Here, we define a method, Select_Directory, which clears the listbox, prompts the user to select a folder using the file dialog, inserts the selected folder path into an entry widget, and then calls another method, Files_in_Listbox, to populate the listbox with files from the selected directory.
    def Select_Directory(self):
        self.Clear_Listbox()
        self.Selected_Folder = filedialog.askdirectory(title = "Select a location")
        self.Folder_Entry.insert(0, self.Selected_Folder)
        # If the user selects a directory
        if self.Selected_Folder != '':
            self.Files_in_Listbox()
Choose the Save To Location
The SaveTo_Directory method prompts the user to select a location using the file dialog and then inserts the selected location into an entry widget for ‘Save To’ purposes.
    def SaveTo_Directory(self):
        self.SaveTo_Loc = filedialog.askdirectory(title = "Select a location")
        self.SaveTo_Entry.insert(0, self.SaveTo_Loc)
Insert the File Names to the Listbox
The Files_in_Listbox method efficiently populates the self.File_ListBox listbox with files from the selected folder based on the specified file type. It uses the ‘glob‘ module to gather matching file paths, then iterates through them, storing file names and paths in a dictionary.
Finally, it inserts the file names into the listbox for a user-friendly display.
    def Files_in_Listbox(self):
        self.File_List = \
        glob.glob(f"{self.Selected_Folder}/*{self.File_Type.get()}")
        for path in self.File_List:
            # Storing the file name with the corresponding file
            # path to the 'self.File_Dict' dictionary
            self.File_Dict[os.path.basename(path)] = path
            self.File_ListBox.insert(END, os.path.basename(path))
Add Files to the Listbox
The Add_File method allows users to add more files to the listbox.
    def Add_File(self):
        File_Path = filedialog.askopenfilenames(initialdir = "/", \
        title = "Select PDF Files", filetypes = \
        ((f"{self.File_Type.get()} files",f"*{self.File_Type.get()}*"),))

        for Path in File_Path:
            # Adding the file path to the 'self.File_List'
            self.File_List.append(Path)
            # Adding the file name(as Key) and path(as Value)
            # to the 'self.File_Dict'
            self.File_Dict[os.path.basename(Path)] = Path
            # Adding the File Name to the ListBox
            self.File_ListBox.insert(END, os.path.basename(Path))
Delete Files from Listbox
This Delete_File method enables users to delete selected files from the listbox. It checks if there are files to delete and displays a warning if not.
If files are present, it removes the selected files from the list, updates the associated dictionary, and reflects the changes in the listbox. If no files are selected, it prompts the user to make a selection before proceeding.
    def Delete_File(self):
        try:
            if len(self.File_List) < 1:
                messagebox.showwarning('Warning!', \
                'There are no more files to delete')
            else:
                for item in self.File_ListBox.curselection():
                    self.File_List.remove(\
                    self.File_Dict[self.File_ListBox.get(item)])
                    self.File_Dict.pop(self.File_ListBox.get(item))

                    self.File_ListBox.delete(item)
        except Exception:
            messagebox.showwarning('Warning!', "Please select PDFs first")
Create a Thread and Perform Renaming Operation
To ensure a smooth and efficient renaming process, we tap into the power of multi-threading. Here, we create a separate thread using Python’s threading module to perform the renaming operation. The Threading method creates a thread with the Rename_Files method as the target.
The renaming process begins by checking if there are files to rename. It displays an error message if none are found. It then verifies that the user has selected a saving location and prompts a warning if not.
Depending on whether the user entered a base file name, the code performs the renaming accordingly, updating the status along the way. After completion, the listbox is cleared, and a ‘Renaming Completed’ message is displayed.
    def Threading(self):
        # Killing a thread through "daemon=True" isn't a good idea
        self.x = Thread(target=self.Rename_Files, daemon=True)
        self.x.start()

    def Rename_Files(self):
        # If no files are presented in the 'self.File_List'
        # a Tkinter MessageBox will pop up
        if len(self.File_List) == 0:
            messagebox.showerror('Error!', "There are no files to rename")
        else:
            # If the user doesn't select the Saving Location a warning message will display
            if self.SaveTo_Entry.get() == '':
                messagebox.showwarning('Warning!', \
                "Please Select a Save Location")
            else:
                # If the user doesn't enter the Base File Name
                if self.ResultFile_Entry.get() == '':
                    self.Status_Message(status = 'Renaming...')
                    for file in self.File_List:
                        source = file

                        Part1 = self.SaveTo_Entry.get()
                        Part2 = self.File_List.index(file)
                        Part3 = self.File_Type.get()

                        destination = f"{Part1}/{Part2}{Part3}"
                        # Calling the os.rename function
                        os.rename(source, destination)
                    self.Clear_Listbox()
                    self.Status_Message(status = 'Renaming Completed.')
                    self.Done_Message()
                else:
                    # If the user entered the Base File Name
                    self.Status_Message(status = 'Renaming...')
                    for file in self.File_List:
                        source = file

                        Part1 = self.SaveTo_Entry.get()
                        Part2 = self.ResultFile_Entry.get()
                        Part3 = self.File_List.index(file)
                        Part4 = self.File_Type.get()

                        destination = f"{Part1}/{Part2}_{Part3}{Part4}"
                        # Calling the os.rename function
                        os.rename(source, destination)
                    self.Clear_Listbox()
                    self.Status_Message(status = 'Renaming Completed.')
                    self.Done_Message()
Display the Status
The Status_Message method keeps you informed every step of the way. It vigilantly monitors the renaming process and offers clear updates in three distinct phases: ‘Not Started Yet,’ ‘Renaming…’, or ‘Renaming Completed’.
    def Status_Message(self, **Status):
        for key, value in Status.items():
            self.Status_Label.config(text=value)
Clear the Listbox
To guarantee a fresh start for each file renaming session, the Clear_Listbox method efficiently resets various Python variables and Tkinter widgets. It clears the file list, resets dictionaries, and updates labels and entry widgets to their default states.
    # It clears the 'self.File_ListBox' and resets
    # some python variables and Tkinter widgets
    def Clear_Listbox(self):
        self.File_List.clear()
        self.File_Dict.clear()
        self.Selected_Folder = ''
        self.SaveTo_Loc = ''
        self.Status_Label.config(text="Not Started Yet")
        self.Folder_Entry.delete(0, END)
        self.SaveTo_Entry.delete(0, END)
        self.ResultFile_Entry.delete(0, END)
        self.File_ListBox.delete(0, END)
Miscellaneous Methods
Last call for methods! Let’s add these final three and officially launch our File Renamer Application:
Done_Messagedisplays an informative message confirming the successful renaming of files.About_Windowopens a window with details about the File Renamer application.Exit_Windowcloses the application window when called.
    def Done_Message(self):
        messagebox.showinfo('Done!', "The files are renamed successfully")

    def About_Window(self):
        messagebox.showinfo("File Renamer 22.05",\
        "Developed by Subhankar Rakshit\n~PySeek")

    def Exit_Window(self):
        self.window.destroy()
Initializing the Application
In the main part of your code, create an instance of the File_Renamer class to build the GUI, and then start the main loop.
if __name__ == "__main__":
    root = Tk()
    # Creating a 'File_Renamer' class object
    obj = File_Renamer(root)
    root.mainloop()
In this block of code, we check if the script is being run as the main program (`__name__ == “__main__”`). This ensures that the code inside this block only runs when the script is executed, not when it’s imported as a module.
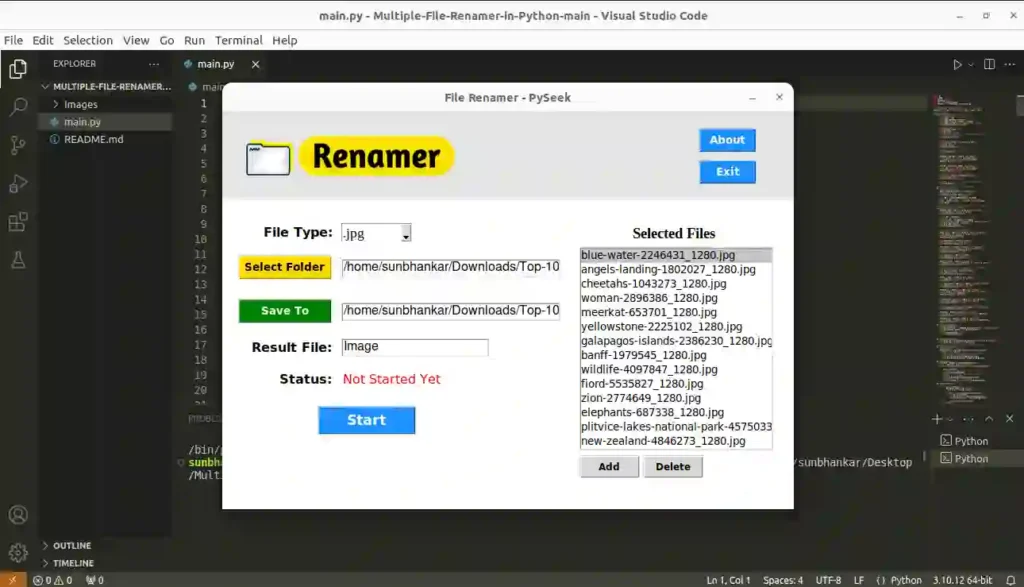
Output
Summary
Congratulations! You’ve successfully created a File Renamer Application using Python Tkinter. With just one click, it can efficiently rename multiple files in a folder. The added features include:
- Selecting the target folder.
- Choosing the Save To location.
- Setting a base name for the renamed files.
- Displaying available file names in a list box.
- Adding and deleting files in the listbox.
This application proves especially handy when dealing with folders containing numerous similar file types with nearly identical base names, such as those downloaded from messaging platforms like WhatsApp or other social media.
For more Tkinter inspiration, check out our dedicated page filled with exciting Python Projects. Here are a few to pique your interest:
- Meditation App in Python: Helps to Practice Deep Breathing
- Test Your Typing Speed with Python – Tkinter Project
- Create an Advanced Alarm Clock Using Python Tkinter
- Image to Pencil Sketch Converter in Python – Tkinter Project
If you have any burning questions about this topic, feel free to drop them in the comments section.
Happy Renaming!