![]()
Introduction
The Library Management System is a software solution that helps manage the daily operations of a library. It is designed to automate routine tasks, such as cataloging, circulation, acquisitions, and inventory management, which enables librarians to focus on providing better services to their patrons.
Many formalities come under library management. A Library Management System can bring several benefits here. For growing knowledge and enhancing skills to solve real-life problems I developed a Library Management System Project in Python using Tkinter and MySQL.
It will help to manage the following tasks:
- Add new books to the database.
- Issue books to the users or students.
- Take borrowed books from the users or students.
- Issue the book again to the person who is already holding that book.
- Displays all the book records presented in the library with the total available piece of each book (It shows all the records in a table view format).
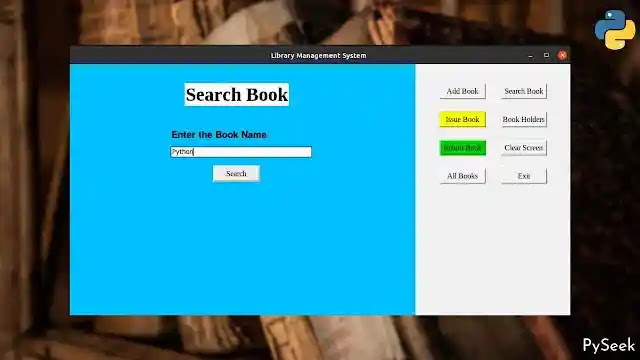
- Search a book by name. In this case, if the users don’t know the full name of the book, they can search by only a word or characters instead.
- Update and delete the book records.
- Displays the records of all the borrowers with the related information.
The Project Details
The graphical interface of this project is managed by the Tkinter library. The PyMySQL package is used here to manage database operations using Python. The project folder contains three Python files, ‘main.py’, ‘custom.py’, and ‘credentials.py’.
As the name of ‘main.py’, it handles all the tasks related to library management. ‘custom.py’ has several information about the colors and fonts used in the main program (main.py). ‘credentials.py’ contains credentials to log in to the MySQL Server. Here, users need to enter their own Username and Password for the MySQL server.
As we’ll be interacting with the database, it’s essential to have MySQL Server installed on your system (You can find instructions on how to install MySQL on Windows, Linux, and Mac). If you’ve already completed this step, there’s no need to do it again.
Create a Database and Two Tables
Create a Database with this name: library_management.
create database library_management;Create a table book_list under the library_management database.
create table book_list(
	book_id VARCHAR(10) NOT NULL,
	book_name VARCHAR(50) NOT NULL,
	author VARCHAR(50) NOT NULL,
	edition VARCHAR(10) NOT NULL,
	price Int(6) NOT NULL,
	qty Int(4) NOT NULL,
	PRIMARY KEY ( book_id )
);
Create a table borrow_record under the same database.
create table borrow_record(
	book_id VARCHAR(10) NOT NULL,
	book_name VARCHAR(50) NOT NULL,
	stu_roll VARCHAR(15) NOT NULL,
	stu_name VARCHAR(50) NOT NULL,
	course VARCHAR(10) NOT NULL,
	subject VARCHAR(30) NOT NULL,
	issue_date date NOT NULL,
	return_date date NOT NULL
);
Create a Dedicated MySQL User and Grant Privileges
I suggest to create a specific MySQL user exclusively for this project and grant the necessary privileges. Please perform the following steps:
1. Log in to MySQL:
You’ll need to have administrative access to your MySQL server. You can log in using the MySQL command-line client:
mysql -u root -pReplace root with your MySQL username if it’s different, and you’ll be prompted for the MySQL root password.
2. Create a New User:
To create a new MySQL user, you can use the `CREATE USER` command. Replace `username` and `password` with your desired username and password:
CREATE USER 'username'@'localhost' IDENTIFIED BY 'password';This creates a user called `username` that can only connect from the local machine. If you want to allow connections from any host, replace `localhost` with `%`.
3. Grant Privileges:
You can use the `GRANT` statement to assign privileges to the user. Here’s how to grant various privileges:
Grant all privileges on a specific database:
GRANT ALL PRIVILEGES ON database_name.* TO 'username'@'localhost';Grant specific privileges (e.g., GRANT CREATE, ALTER, DROP, INSERT, UPDATE, INDEX, DELETE, SELECT, REFERENCES, RELOAD) on a specific database:
GRANT SELECT, INSERT, UPDATE, DELETE ON database_name.* TO 'username'@'localhost';Replace `database_name` with the name of the database you want to grant access to.
Grant all privileges on all databases (not recommended for security reasons):
GRANT ALL PRIVILEGES ON *.* TO 'username'@'localhost';4. Apply Privileges:
After granting privileges, you need to apply the changes using the FLUSH PRIVILEGES command:
FLUSH PRIVILEGES;5. Exit MySQL:
Now you can exit the MySQL Client:
exit;Requirements and Installation
Make sure that you have Python installed on your system. You will also need to install PyMySQL (Documentation) library for connecting to and interacting with MySQL databases.
pip install PyMySQLNote that, by default Tkinter (Documentation) comes with most Python installations, so you likely won’t need to install it separately. However, if you don’t have it, you can install it using pip:
pip install tkWhat can you learn from this project?
- Creating a graphical interface with Tkinter: Creating Tkinter windows, frames, labels, input widgets, buttons, etc.
- Connecting Python to MySQL: How to connect python to MySQL.
- Database operations in python: Access data from a table, update and delete operations, etc.
- Creating multiple python modules to manage several tasks.
- Object Orient Programming in Python: Using classes, objects, etc.
- Check a valid email id: Using the regular expression in python.
Output of the Library Management System
Be sure to watch the complete video to understand how this Library Management System operates.
Download the Source Code
Download the project files through the Download button below. The files will be in a zip format, and you’ll need to extract them to access the primary program files.
Summary
In this tutorial, we discussed a library management system project in Python. Here we have handled graphical interface and database-related tasks using Tkinter and MySQL respectively.
The code is not suitable for copying and pasting because of its length. Therefore, I’ve provided the Project files in a zip format above, which you can download using the ‘Download’ button
In conclusion, a library management system can be a valuable tool for libraries looking to improve their operations, enhance their services, and meet the changing needs of their users.
Find more Python Projects related to Python and MySQL here:
👉Student Management System Project in Python with MySQL
👉Create a Login and Registration form using Python and MySQL
👉Contact Management System Project in Python with MySQL
If you have any queries or feedback, leave in the comments below. You’ll get a reply soon.
Happy Coding!