![]()
Introduction
Do you often find yourself drowning in a sea of cluttered files on your computer? Are you tired of sifting through folders filled with unorganized files? If so, you’re not alone. Many of us struggle to keep our digital lives organized, leading to frustration and wasted time. But fear not! There’s a solution on the horizon.
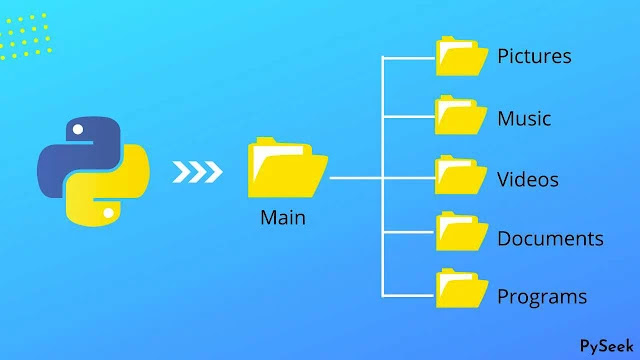
In this article, we will create an effective Junk File Organizer in Python using the user-friendly Tkinter library. It can organize files by extension to the relevant folders. For example, all mp3 files to the ‘Music’ folder, all image files to the ‘Image’ folder, all mp4 files to the ‘Videos’ folder, and so on.
So, let’s get started.
Why Organize Junk Files?
Before we dive into the code, let’s briefly discuss why organizing junk files is essential. Over time, our computers accumulate a significant amount of data, including documents, images, videos, audio files, and more. Without proper organization, finding the right file when you need it can become a daunting task. Organizing your files not only saves you time but also helps maintain a clean and clutter-free digital workspace.
Requirements
Before we begin, make sure you have Python installed on your system. You’ll also need the following libraries installed on your system and a basic understanding of Python programming concepts. (To learn Python, visit this page: Python Tutorials):
pip install tk
pip install Pillow
Getting Started
To begin, create a separate directory for this project, naming it “File_Organizer” Afterward, establish one additional sub-directory within this folder with the title ‘Images‘. Get the required image files from here (logo.png). Subsequently, place the file into the ‘Images‘ folder. You can use your favorite code editor or IDE for this project.
Import Necessary Modules
Within the “File_Organizer” directory, generate a Python file named “organizer.py” and start by importing the required modules:
import os
import shutil
from tkinter import *
from threading import *
from PIL import ImageTk, Image
from tkinter import messagebox, filedialog
Available File Types
Next, we’ll create a Python dictionary called `file_types` to include the file formats you want to sort. You can modify these dictionary entries to suit your specific needs.
file_types={
   'Documents' : ('.pdf','.doc','.xls','txt','.csv','.xml','.zip', '.docx', '.DOCX', '.odt'),
   'Pictures' : ('.jpg','.jpeg','.png','.JPG', '.webp'),
   'Videos' : ('.mp4','.mkv','.3gp','.flv','.mpeg'),
   'Music' : ('.mp3','.wav','.m4a','.webm'),
   'Programs' : ('.py','.cpp','.c','.sh','.js'),
   'Apps' : ('.exe','.apk'),
}
Define the `File_Organizer` Class
Create a class and give it the name `File_Organizer`.
class File_Organizer:
Create the Main Application Window
The `__init__` method will create the main application window for us. Here, we specify the window size, title, background color, resizable option, etc.
    def __init__(self, root):
        # Setting the Tkinter main window
        self.window = root
        self.window.geometry("720x500")
        self.window.title('File Organizer - PySeek')
        self.window.resizable(width = False, height = False)
        self.window.configure(bg='gray90')
        self.selected_dir = ''
        self.browsed = False
        # Frame 1: For the Logo
        self.frame_1 = Frame(self.window,bg='gray90',
        width=280, height=70)
        self.frame_1.pack()
        self.frame_1.place(x=20, y=20)
        self.display_logo()
        # About Button
        About_Btn = Button(self.window, text="About",
        font=("Kokila", 10, 'bold'), bg="dodger blue",
        fg="white", width=5, command=self.about_window)
        About_Btn.place(x=600, y=20)
        # Exit Button
        Exit_Btn = Button(self.window, text="Exit",
        font=("Kokila", 10, 'bold'), bg="dodger blue",
        fg="white", width=5, command=self.exit_window)
        Exit_Btn.place(x=600, y=60)
        # Frame 2: For the Main Page Widgets
        self.frame_2 = Frame(self.window, bg="white",
        width=720,height=480)
        self.frame_2.place(x=0, y=110)
        self.main_window()
Set the Logo
We can set a logo for this application to enhance its appearance. Assuming you have obtained the logo from the source mentioned in the “Getting Started” section and positioned it correctly.
    def display_logo(self):
        image = Image.open('Images/logo.png')
        resized_image = image.resize((280, 70))
        self.logo = ImageTk.PhotoImage(resized_image)
        label = Label(self.frame_1, bg='gray90',image=self.logo)
        label.pack()
Create the Main Window
Next, create a separate method named main_window. This method will present all the components related to file organization within a folder. This includes features like the “Select Folder” button for selecting a directory via the Tkinter dialog box, an entry widget for manually entering the target folder’s location, a status label, and the “Start” button.
    def main_window(self):
        Heading_Label = Label(self.frame_2,
        text="Please Select the Folder",
        font=("Kokila", 20, 'bold'), bg='white')
        Heading_Label.place(x=160, y=20)
        Folder_Button = Button(self.frame_2, text="Select Folder",
        font=("Kokila", 10, 'bold'), bg="gold", width=10,
        command=self.select_directory)
        Folder_Button.place(x=130, y=80)
        self.Folder_Entry = Entry(self.frame_2,
        font=("Helvetica", 12), width=32)
        self.Folder_Entry.place(x=256, y=85)
        Status = Label(self.frame_2, text="Status: ",
        font=("Kokila", 12, 'bold'), bg='white')
        Status.place(x=180, y=130)
        # Status Label:
        self.Status_Label = Label(self.frame_2, text="Not Started Yet",
        font=("Kokila", 12), bg="white", fg="red")
        self.Status_Label.place(x=256, y=130)
        Start_Button = Button(self.frame_2, text="Start",
        font=("Kokila", 13, 'bold'), bg="dodger blue", fg="white",
        width=8, command=self._threading)
        Start_Button.place(x=280, y=180)
Select the Target Folder
Now, let’s define a method called `select_directory` for selecting the target folder.
    def select_directory(self):
        self.selected_dir = filedialog.askdirectory(title =
        "Select a location")
        self.Folder_Entry.insert(0, self.selected_dir)
        self.selected_dir = str(self.selected_dir)
        # Checking if the folder path is exists or not
        if os.path.exists(self.selected_dir):
            self.browsed = True
Handling the Organizer Events
Before proceeding with the creation of the `organizer` method, let’s introduce another method called `_threading`. It will start a separate thread using Python’s `threading` module to call the `organizer` method.
This approach will provide more functional versatility to the application. For example, it will enable simultaneous execution of tasks related to GUI and organization processes, ensuring smooth parallel operation.
    def _threading(self):
        self.x = Thread(target=self.organizer, daemon=True)
        self.x.start()

    def organizer(self):
        # If no directory is chosen
        if not self.browsed:
            messagebox.showwarning('No folders are choosen',
            'Please Select a Folder First')
            return
        try:
            # Showing the current status of the operation
            self.Status_Label.config(text='Processing...')
            self.Current_Path = self.selected_dir
            if os.path.exists(self.Current_Path):
            # self.Folder_List1: stores all the folders that
            # are already presented in the selected directory
                self.Folder_List1 = []
                # self.Folder_List2: stores newly created folders
                self.Folder_List2 = []
                self.flag = False
                for folder, extensions in file_types.items():
                    self.folder_name = folder
                    self.folder_path = os.path.join(self.Current_Path, self.folder_name)
                    # Change the directory to the current
                    # folder path that we've selected
                    os.chdir(self.Current_Path)
                    # If the folder is already present in that directory
                    if os.path.exists(self.folder_name):
                        self.Folder_List1.append(self.folder_name)
                    # If the folder is not present in that directory,
                    # then create a new folder
                    else:
                        self.Folder_List2.append(self.folder_name)
                        os.mkdir(self.folder_path)

                    # Calling the 'file_finder' function to
                    # find a specific type of file (or extension)
                    # and change their old path to new path.
                    for item in self.file_finder(self.Current_Path, extensions):
                        self.Old_File_Path = os.path.join(self.Current_Path,item)
                        self.New_File_Path = os.path.join(self.folder_path,item)
                        # Moving each file to their new location
                        shutil.move(self.Old_File_Path, self.New_File_Path)
                        self.flag = True
            else:
                messagebox.showerror('Error!','Please Enter a Valid Path!')
            # Checking if the files are separated or not
            # If `flag` is True: It means the program discovered
            # matching files and they have been organized.
            if self.flag:
                self.Status_Label.config(text='Done!')
                messagebox.showinfo('Done!', 'Operation Successful!')
                self.reset()
            # If `flag` is False: It means the program didn't find
            # any matching files there; only empty folders are created.
            if not self.flag:
                self.Status_Label.config(text='Complete!')
                messagebox.showinfo('Done!',
                'Folders have been creatednNo Files were there to move')
                self.reset()
        # If any error occurs
        except Exception as es:
            messagebox.showerror("Error!",f"Error due to {str(es)}")
Looking for the Presented Files
The `file_finder` method locates a particular file format within a provided directory path and appends it to a Python list. Later, the function returns this list.
    def file_finder(self, folder_path, file_extensions):
        self.files = []
        for file in os.listdir(folder_path):
            for extension in file_extensions:
                if file.endswith(extension):
                    self.files.append(file)
        return self.files
Reset the Application
We can define a method named `reset` to clear both the Entry and Label widgets and reset the ‘selected_dir’ variable following each successful operation.
    def reset(self):
        self.Status_Label.config(text='Not Started Yet')
        self.Folder_Entry.delete(0, END)
        self.selected_dir = ''
About and Exit Methods
We’ve set up “About” and “Exit” buttons in the application’s header section. Let’s create two corresponding methods for these buttons.
    def about_window(self):
        messagebox.showinfo("File Organizer",
        "Developed by Subhankar Rakshitn~PySeek")

    def exit_window(self):
        self.window.destroy()
Initializing the Application
In the main part of your code, create an instance of the File_Organizer class to build the GUI, and then start the main loop.
if __name__ == "__main__":
    root = Tk()
    obj = File_Organizer(root)
    root.mainloop()
In this block of code, we check if the script is being run as the main program (`__name__ == “__main__”`). This ensures that the code inside this block only runs when the script is executed, not when it’s imported as a module.
How the application works
- Click the “Select Folder” button to select the folder you want to organize or you can paste the location directly to the entry box.
- After selecting the folder, click the “Start” button.
- The application will categorize and move files into folders based on their extensions (e.g., Images, Documents, Audio, Videos, etc).
- A success message will be displayed once the files are organized.
Output
Be sure to watch the complete video to gain a comprehensive understanding of how this File Organizer App works.
Summary
In this article, we explored how to create a Junk File Organizer using Python and the Tkinter library. We discussed the importance of maintaining an organized digital workspace and introduced the Tkinter library as a user-friendly tool for creating graphical user interfaces. The article provided step-by-step instructions on building the Junk File Organizer, including creating a GUI, organizing files based on their extensions, and running the organizer.
With this simple yet effective tool, you can streamline your digital chaos, save time, and enjoy a more organized and efficient digital workspace. Say goodbye to the frustration of unsorted files and hello to a tidier digital life!
Feel free to ask any questions related to this project. For more interesting Tkinter examples, please explore the dedicated page exclusively for Python Projects.
Happy Coding!