![]()

In today’s data-driven world, computer vision has emerged as a powerful tool for extracting valuable information from visual data. One such application is number detection, a technique that enables machines to recognize and interpret numerical digits from images and videos.
In this article, we’ll walk through a Python project focusing on detecting numbers using the powerful YOLOv8 model. This project is designed to recognize and detect numbers in both images and live video feeds using the OpenCV library.
We’ll cover two Python programs here: one for detecting numbers in images and another for live detection using a webcam or IP camera. These programs are designed to be beginner-friendly yet powerful enough to perform number detection from images and even videos.
Let’s dive into the details!
Recommended Article: Creating a Bike Helmet Detection Project in Python using YOLO
Requirements and Installations
Before we start coding, let’s ensure Python (3.6 or later) is installed on your computer. If you don’t have Python, you can download it for free from https://www.python.org/downloads/.
Now download all the dependencies we require using the following commands:
pip install gitpython>=3.1.30
pip install matplotlib>=3.3
pip install numpy>=1.23.5
pip install opencv-python>=4.1.1
pip install pillow>=10.3.0
pip install psutil
pip install PyYAML>=5.3.1
pip install requests>=2.32.0
pip install scipy>=1.4.1
pip install thop>=0.1.1
pip install torch>=1.8.0
pip install torchvision>=0.9.0
pip install tqdm>=4.64.0
pip install ultralytics>=8.2.34
pip install pandas>=1.1.4
pip install seaborn>=0.11.0
pip install setuptools>=65.5.1
pip install filterpy
pip install scikit-image
pip install lap
Alternative Installation
Installing the above utilities one by one might be a boring task. Instead, you can download the ‘requirements.txt‘ file containing all the dependencies above. Simply run the following command. It will automate the whole task in one go.
pip install -r requirements.txt
Training of YOLO Model on Custom Dataset
At the very first, we have to train our YOLO model. Please follow the steps below:
Download the Dataset
Download the number detection dataset from roboflow.com.
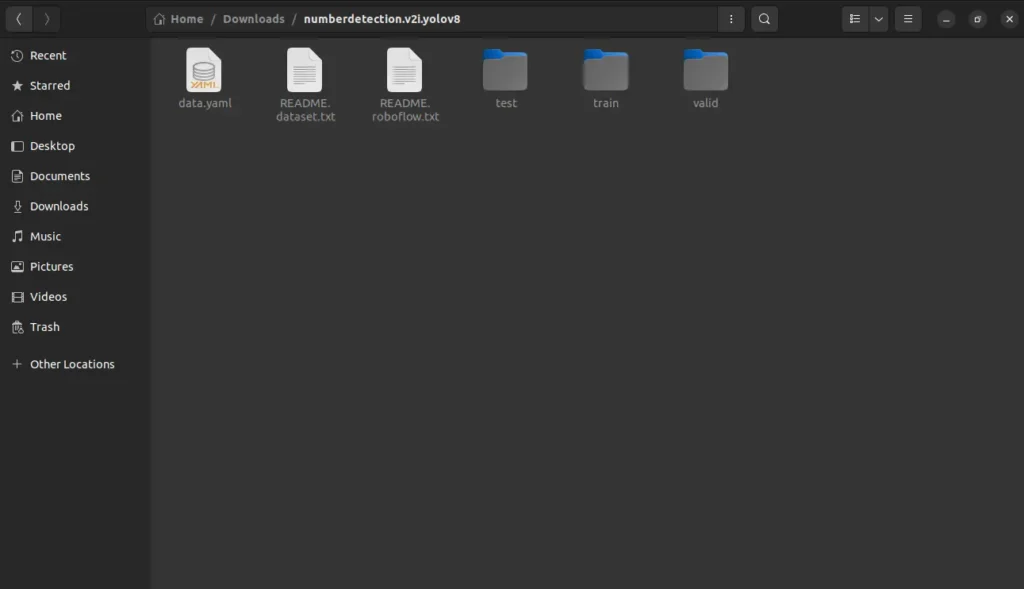
Now unzip the downloaded dataset. The folder should look like the following:
Training YOLOv8 Model with Custom Dataset using Colab
Open Google Colab, sign in with your Gmail account, and open a new notebook.
Now go to the ‘Runtime‘ menu, select ‘Change runtime type‘, choose ‘T4 GPU‘ for the Hardware accelerator, and save it.
Let’s check whether the GPU is running perfectly or not using the following command:
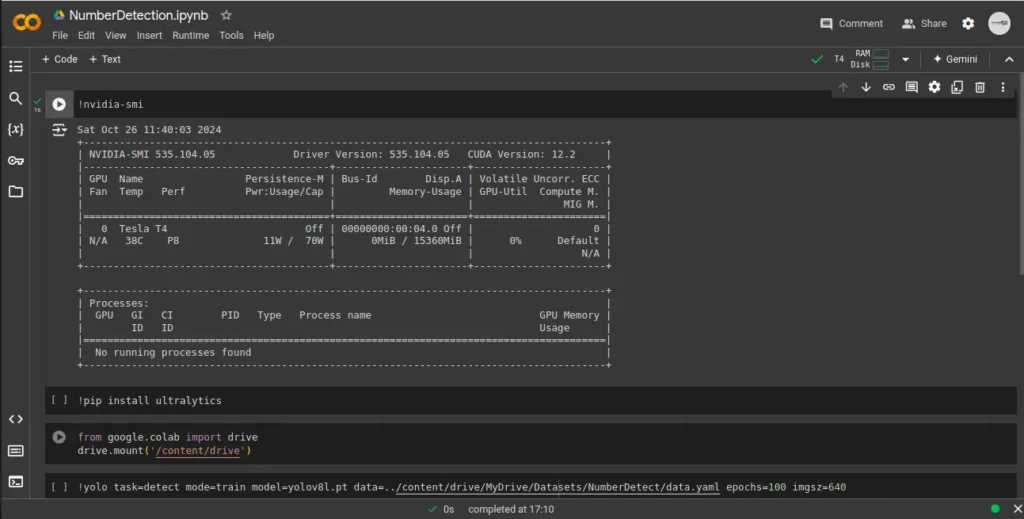
!nvidia-smi
The output should look like the following:
Next, install ultralytics on your colab workspace using the following command:
!pip install ultralytics
Now open your Google Drive and navigate to ‘My Drive.’ Now create a folder named ‘Datasets‘ under ‘My Drive’ and inside the ‘Datasets’ folder create one more folder ‘NumberDetect.’
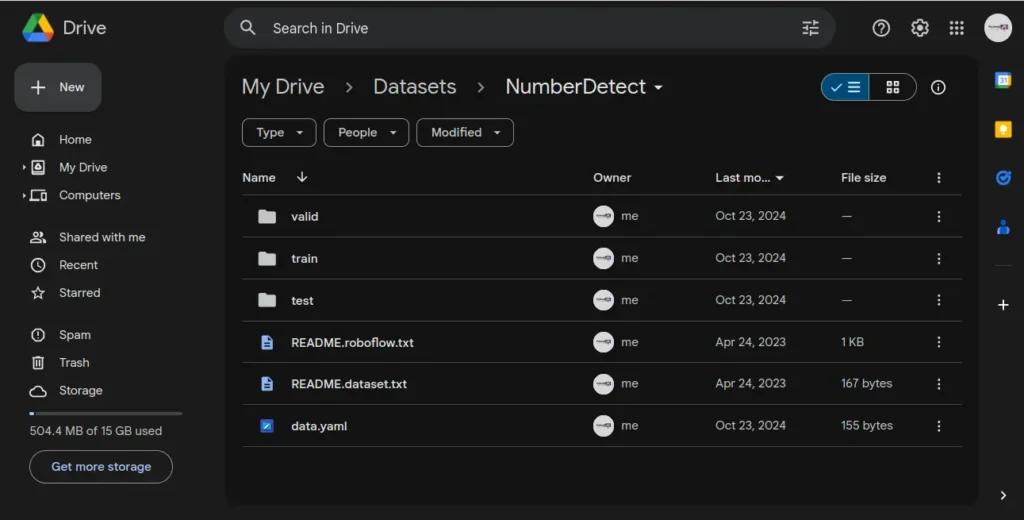
Let’s open the unzipped dataset folder, select all items present there, and drop them into the ‘NumberDetect’ folder on Google Drive. It may take a while so wait until it is finished. The final ‘NumberDetect’ folder will look like the following:
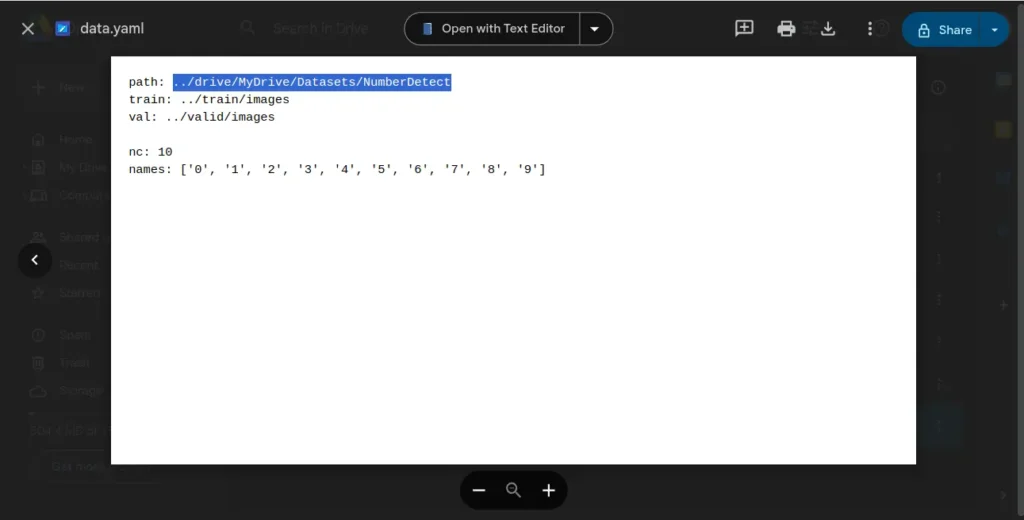
Now open the ‘data.yaml‘ file in the text editor and modify the path variable to: “../drive/MyDrive/Datasets/NumberDetect” The final ‘data.yaml‘ file will look like the following:
Now, let’s go back to our Google Colab dashboard. You need to mount your Google Drive with the Colab. Insert the following command in a new cell and run it:
from google.colab import drive
drive.mount('/content/drive')
You should get a success message like this: “Drive already mounted at /content/drive; to attempt to forcibly remount, call drive.mount(“/content/drive”, force_remount=True).”
Now we will start training our YOLO model with our number detection dataset. Again, create a new cell, insert the command below, and run it.
!yolo task=detect mode=train model=yolov8l.pt data=../content/drive/MyDrive/Datasets/NumberDetect/data.yaml epochs=100 imgsz=640
Here, ‘epochs=100‘ specifies the number of training epochs. An epoch is one complete pass through the entire training dataset. Here, the model will be trained for 100 epochs.
‘imgsz=640‘ sets the size of the input images on which the model will be trained. In this case, images will be resized to 640×640 pixels before being fed into the model.
The whole training can take around 1 – 2 hours even more to complete.
After, the completion of the training go to the ‘Files‘ section in your Colab dashboard and navigate through these folders: ‘runs’ -> ‘detect’ -> ‘train’ -> ‘weights’. Inside the ‘weights‘ folder you will see ‘best.pt‘ and ‘last.pt‘ these two files. Download ‘best.pt‘ from there.
Setting Up the Environment
Create a separate folder named “NumberDetector” for this project. Under this folder create two more folders named ‘Weights‘ and ‘Media‘ to store pre-trained YOLO models and images respectively.
Place the Downloaded YOLO Model
In the previous section, we trained our YOLO model with a custom number detection dataset and downloaded a file named ‘best.pt.’ Now place this file inside the ‘Weights’ folder.
Create Your Python Script
We’re almost at the end of setting up the environment. Now choose your favorite text editor and open the entire project folder ‘NumberDetector.’ Inside this folder, create a Python program file named ‘number_detector.py.‘ This is where you’ll write the code.
Your final project file hierarchy should look like the following:
NumberDetector/
├── Weights/
│   └── best.pt
├── Media/
│   └── number_1.jpg
│   └── number_2.jpg
├── number_detector.py
├── number_detector_video.py
Number Detection from Images
First, we will create a Python program to detect numbers only in images. Let’s start writing your code step-by-step and try to understand the logic.
Import Libraries
First, we need to import the necessary libraries. Here, ‘OpenCV‘ is used for image processing, ‘cvzone‘ helps draw bounding boxes, and ‘YOLO’ from the ‘ultralytics‘ library is used for object detection.
import cv2
import math
import cvzone
from ultralytics import YOLO
Load YOLO Model and Define Class Names
Next, load the YOLO model with the custom-trained weights and define the class names that YOLO can detect. Make sure you have downloaded the ‘best.pt‘ weights and placed them in the correct directory.
# Load YOLO model with custom weights
yolo_model = YOLO("Weights/best.pt")

# Define class names
class_labels = ['0', '1', '2', '3', '4', '5', '6', '7', '8', '9']
Load the Image
Now, load the image you want to process using OpenCV’s ‘imread‘ method.
# Load the image
image_path = "Media/number_1.jpg"
img = cv2.imread(image_path)
Perform Object Detection
Now use ‘yolo_model‘ to detect objects in the loaded image.
# Perform object detection
results = yolo_model(img)
Draw Bounding Boxes and Labels
Now we will loop through the detected objects and draw bounding boxes around them. The confidence score and class label will also be displayed.
# Loop through the detections and draw bounding boxes
for r in results:
    boxes = r.boxes
    for box in boxes:
        x1, y1, x2, y2 = box.xyxy[0]
        x1, y1, x2, y2 = int(x1), int(y1), int(x2), int(y2)

        w, h = x2 - x1, y2 - y1

        conf = math.ceil((box.conf[0] * 100)) / 100
        cls = int(box.cls[0])

        if conf > 0.3:
            cvzone.cornerRect(img, (x1, y1, w, h), t=2)
            cvzone.putTextRect(img, f'{class_labels[cls]} {conf}', (x1, y1 - 10), scale=0.8, thickness=1, colorR=(255, 0, 0))
Display the Image
Finally, we will display the processed image using OpenCV’s ‘imshow‘ method. The window will close when the ‘q‘ button is pressed.
# Display the image with detections
cv2.imshow("Image", img)
# Close window when 'q' button is pressed
while True:
if cv2.waitKey(1) & 0xFF == ord('q'):
break
cv2.destroyAllWindows()
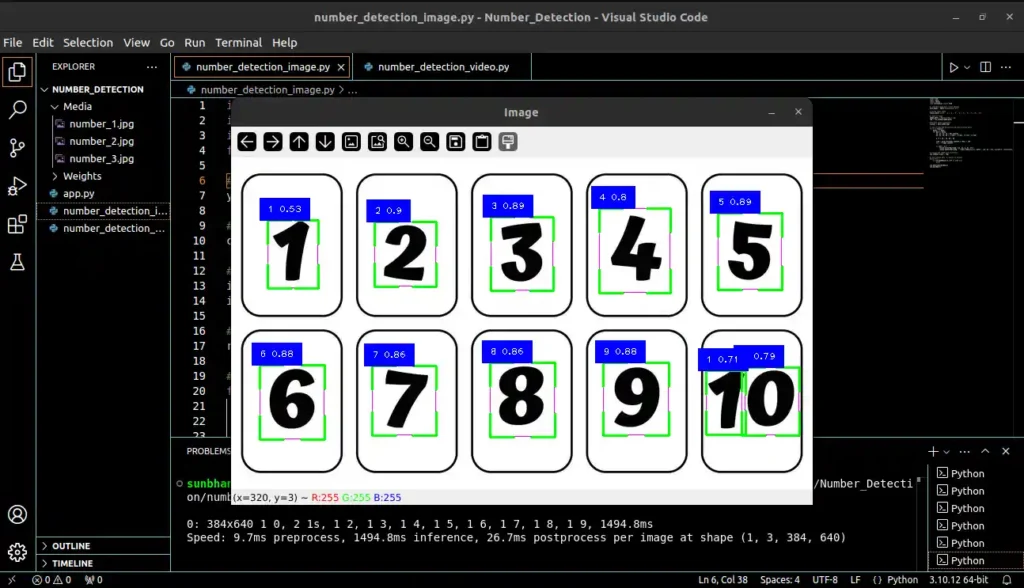
cv2.waitKey(1)Output
Live Number Detection with Webcam
This program detects numbers in real-time through a webcam or IP camera. It is not only a webcam; it can also detect numbers in a video.
In the program below, we use ‘cv2.VideoCapture()‘ to capture video frames. You can set the argument inside ‘VideoCapture()‘ to ‘0‘, ‘1‘, or the specific webcam index number to capture frames directly from your computer’s webcam. To capture video from an IP webcam, replace this with “ip_address/video”. This can also be used to access mobile cameras through Python.
If you’d like to detect numbers in a pre-recorded video, simply specify the video file path within ‘VideoCapture()‘.
In the code, I’ve provided separate lines for each capture option, so you can switch between them by commenting out the lines based on your requirements.
import cv2
import math
import cvzone
import threading
from ultralytics import YOLO
# Load YOLO model with custom weights
yolo_model = YOLO("Weights/best.pt")
# Define class names
class_labels = ['0', '1', '2', '3', '4', '5', '6', '7', '8', '9']
frame = None
def capture_video(video_capture):
global frame
while True:
success, img = video_capture.read()
if success:
frame = img
# For number detection through webcam
video_capture = cv2.VideoCapture(0)
# For number detection through ip webcam
# url = 'ip_address_here/video'
# video_capture = cv2.VideoCapture(url)
# For number detection in a video
# video_path = "video_file_here"
# video_capture = cv2.VideoCapture(url)
# Start the video capture in a separate thread
capture_thread = threading.Thread(target=capture_video, args=(video_capture,))
capture_thread.daemon = True
capture_thread.start()
while True:
# Perform object detection
results = yolo_model(frame)
for r in results:
boxes = r.boxes
for box in boxes:
x1, y1, x2, y2 = box.xyxy[0]
x1, y1, x2, y2 = int(x1), int(y1), int(x2), int(y2)
w, h = x2 - x1, y2 - y1
conf = math.ceil((box.conf[0] * 100)) / 100
cls = int(box.cls[0])
if conf > 0.3:
cvzone.cornerRect(frame, (x1, y1, w, h), t=2)
cvzone.putTextRect(frame, f'{class_labels[cls]} {conf}', (x1, y1 - 10), scale=0.8, thickness=1, colorR=(255, 0, 0))
# Display the frame with detections
cv2.imshow("Image", frame)
if cv2.waitKey(1) & 0xFF == ord('q'):
break
cv2.destroyAllWindows()
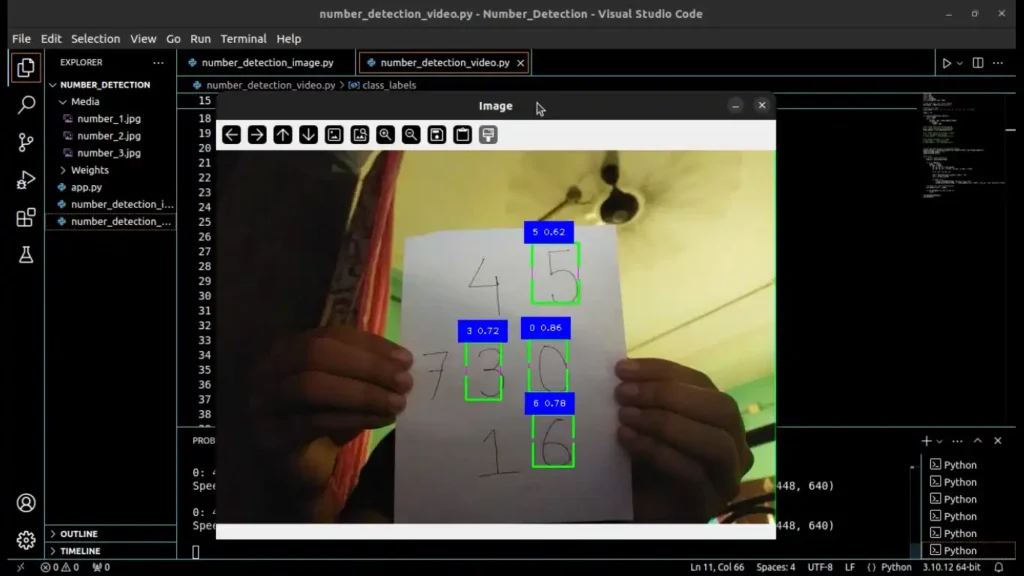
cv2.waitKey(1)Output
Summary
In this tutorial, we developed a number detection system using Python, YOLOv8, and OpenCV. We built two Python programs: one to detect numbers in static images and another to detect numbers in real-time through a webcam or in video files.
We’ve covered each step in detail here, from setting up the environment to training a custom YOLO model with a number detection dataset.
Recommended Article: Detecting Potholes on Roads Using Python and YOLOv8
For any query related to this project, reach out to me at contact@pyseek.com.
Happy Coding!