![]()
Introduction
In recent years, face recognition logins have become more and more popular. This technology provides a secure and easy way to confirm users’ identities. The technology in these systems has improved a lot, making them more accurate and reliable. Nowadays, many businesses and organizations are using this authentication method.
The basic concept behind a face recognition-based login system is simple: instead of requiring users to enter a password or PIN code, the system uses facial recognition technology to verify their identity. The system captures an image of the user’s face and analyzes it to determine if it matches the stored image of the user’s face. If the two images match, the system grants the user access.
So, get ready for an exciting journey! In this tutorial, we’re going to develop such a Face Recognition Login System using Python and MySQL. Pay close attention to every step—we’ve got the key ingredients for a successful project launch on your system. Stick with us until the end for the full experience!
The Project Details
This project features Tkinter library in the front end and MySQL database in the back end. It offers a user-friendly interface that’s not only easy to use but also visually appealing.
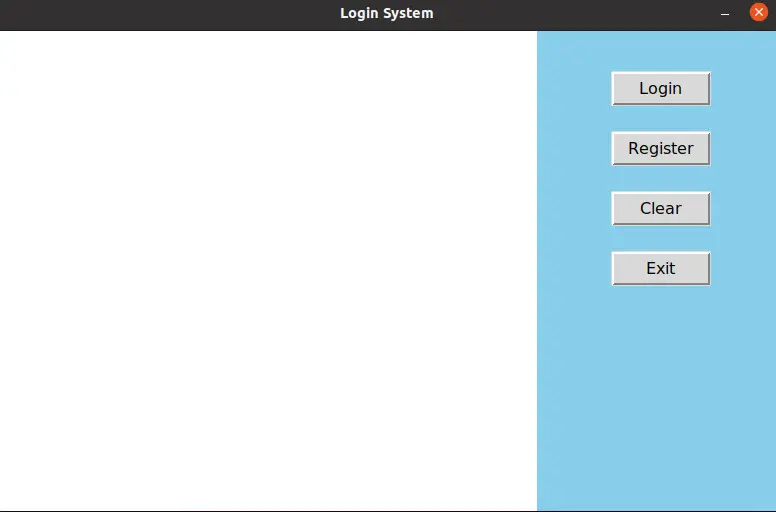
In the image above, you’ll notice the main window featuring four buttons on the right side, each serving a different purpose. The initial button, ‘Login,’ is designed for accessing the system. Upon pressing it, a voice in the background will prompt, “Please center your face before the camera and wait.” Following this, a window will open, capturing the video stream via the webcam. If the displayed face matches the stored faces and the corresponding Face ID is found in the database, another voice will announce “face detected.” Simultaneously, the video stream window will close automatically, revealing the login time on the screen.
The ‘Register‘ button, the second one, opens an admin login panel. Only an admin will have the authority to register a new employee in the system. Before doing so, the admin must log in through the panel using their own credentials.
The next two buttons have the same objective as their names. The ‘Clear‘ button is for clearing all the widgets from the left frame and the ‘Exit‘ is just what it does.
Requirements and Installations
If Python isn’t already a resident on your system, fear not! Grab the latest version from their website (https://www.python.org/). Once settled, remember to install the following libraries using the provided commands.
Note that, before installing the face_recognition library, it’s necessary to install two other libraries—namely, cmake and dlib.
pip install tk
pip install PyMySQL
pip install opencv-python
pip install cmake
pip install dlib
pip install face-recognition
pip install playsound
Create a Database and Tables
To successfully launch the project in your system, first, you must create the following database, tables and declare some default data there. Assuming the MySQL server is installed in your system and you know the basics. Now move forward step by step once more.
Create a database
Let’s create a database named “employee_management”.
create database employee_management;Create a table
Now create a table named “employee_register” under the “employee_management” database.
create table employee_register(
f_name VARCHAR(40) NOT NULL,
l_name VARCHAR(40) NOT NULL,
uid Int NOT NULL AUTO_INCREMENT,
email VARCHAR NOT NULL,
designation VARCHAR NOT NULL,
contact BIGINT NOT NULL,
dob DATE NOT NULL,
join_date DATE NOT NULL,
gender char(15) NOT NULL,
address VARCHAR NOT NULL,
PRIMARY KEY ( uid )
);
Run this command
In the previous section, we have set the user id as Integer type with auto Increment. Here, we will set a base value for it so that the counting starts from that range.
ALTER TABLE employee_register AUTO_INCREMENT=1000;Create the ‘admin’ table
Here, we will create a separate table named ‘admin’ under the “employee_management” database.
create table admin(
username VARCHAR NOT NULL,
password VARCHAR NOT NULL,
PRIMARY KEY ( username )
);
Insert default value into the ‘admin’ table
By default, we will set a default username and password for the admin access of the Login System. Before finalizing the settings, be sure to customize these credentials according to your preferences.
INSERT INTO admin (username,password) VALUES ('Your Username Here','Your Password Here');What can you learn from this Project?
- Creating a graphical interface with Tkinter: Creating a Tkinter window, frame, label, input widget, buttons, etc.
- Connecting Python to MySQL: How to connect python to MySQL, manage data of a database table, retrieve data from a table, update operation, and many more.
- Creating python modules to manage various tasks.
- Object Orient Programming in Python: Use of classes, objects, etc.
- Working with MySQL database using Python programming.
- Working with Face Recognition in Python.
Output of the Face Recognition Login System
You should watch the complete video to understand how this facial recognition login system operates.
Download the Source Code
Download the project files through the Download button below. The files will be in a zip format, and you’ll need to extract them to access the primary program files.
Summary
In this article, our topic of discussion was a Face Recognition Login System using Python. This Login System is crafted with the Python Tkinter library and MySQL database. Instead of traditional methods like typing User ID and Password, users can effortlessly log in by presenting their faces to the camera. Notably, administrators also have access to register new employees through this Login System.
Every single step is important to launch this project successfully on your system. To better understand how this face recognition login system works I would suggest you read the entire article as well as watch the Output Video above so that you don’t miss any point.
Want more delightful Python Projects? You’re in luck! Explore a treasure trove of them on our dedicated page – Python Projects with Source Code! Below are a few instances to spark your interest.
- A face recognition-based attendance system using Python
- Student Management System Project in Python with MySQL
- Library Management System Project in Python with MySQL
- Contact Management System Project in Python with MySQL
Do you have any burning questions about the topic? Drop them in the comments below! I’m here and ready to help you out.
Happy Coding!