![]()
Introduction
In today’s digital age, images play an important role in our lives. Whether you’re a photographer, a social media enthusiast, or a professional presenter, the ability to manage and manipulate images efficiently is highly valuable. One task that comes up frequently in this visual world is adjusting the orientation of images. This is where an image rotator application steps in as a valuable tool.
Imagine you’ve captured a breathtaking landscape, but it’s looking upside down or sideways. Or perhaps you’re compiling a professional report, and the images you’ve inserted don’t align with the document’s format. In such situations, rotating images quickly and precisely becomes necessary. In this tutorial, we will create an Image Rotator Application in Python using the Tkinter library.
Recommended: Create an Image Viewer Application using Python Tkinter
Features of this Application
The application provides the following features:
- You can select the image from the menu bar.
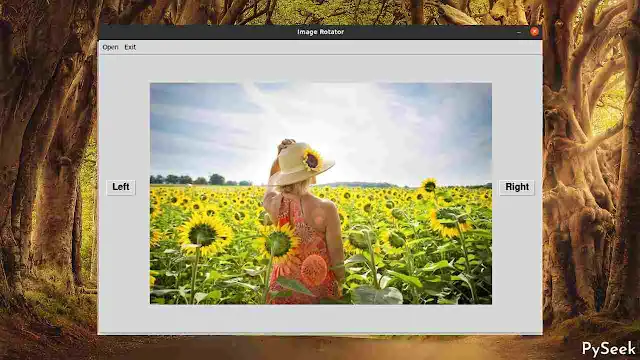
- Once selected, the application will display the chosen image in its current orientation.
- You can then perform 90-degree clockwise and counterclockwise rotations using the ‘Right’ and ‘Left’ buttons, respectively.
- The rotated image will be automatically saved over the original image.
Requirements
Before we dive into the code, ensure that you have Python installed on your system. You’ll also need to install OpenCV and Pillow libraries to manage all the functionalities.
pip install opencv-python
pip install Pillow
Note that, by default, Tkinter comes with most Python installations, so you likely won’t need to install it separately. However, if you don’t have it, you can install it using pip:
pip install tk
The Source Code
Let’s create a project directory named “Image-Rotator-App“. Inside this directory, create a Python script (e.g., `image_rotator.py`) where we’ll write our code.
Importing the Necessary Libraries
Open your `image_rotator.py` script and start by importing the required libraries:
import os
import cv2
from tkinter import *
from PIL import ImageTk, Image
from tkinter import filedialog, messagebox
Defining the Image Rotator Class
Create a class and give it the name `Image_Rotator`.
class Image_Rotator:
Creating the Main Application Window
Now, let’s create the various GUI components for our image rotator. The `__init__` method will create the main application window for us. Within this method, we declare some variables and specify the window size, title, background color, resizable option, menu bar, etc.
    def __init__(self, root):
        self.window = root
        self.window.geometry("960x600")
        self.window.title('Image Rotator')
        self.window.resizable(width = False, height = False)

        self.img = img
        self.rot_image = rot_image
        self.image_name = image_name
        self.Image_Path = image_path

        self.width = 740
        self.height = 480

        # ==============================================
        # ================Menubar Section===============
        # ==============================================
        # Creating Menubar
        self.menubar = Menu(self.window)

        # Adding Edit Menu and its sub menus
        edit = Menu(self.menubar, tearoff=0)
        self.menubar.add_cascade(label='Open', menu=edit)
        edit.add_command(label='Open Image',command=self.open_image)

        # Adding About Menu
        about = Menu(self.menubar, tearoff=0)
        self.menubar.add_cascade(label='About', menu=about)
        about.add_command(label='About', command=self.about)

        # Exit the Application
        exit = Menu(self.menubar, tearoff=0)
        self.menubar.add_cascade(label='Exit', menu=exit)
        exit.add_command(label='Exit', command=self.Exit)

        # Configuring the menubar
        self.window.config(menu=self.menubar)
        # ===================End=======================

        left_btn = Button(self.window, text="Left",
        font=("Helvetica", 15, 'bold'), command=self.rotate_left)
        left_btn.place(x=15,y=270)

        right_btn = Button(self.window, text="Right",
        font=("Helvetica", 15, 'bold'), command=self.rotate_right)
        right_btn.place(x=865,y=270)

        # Creating a Frame
        self.frame_1 = Frame(self.window,
        width=self.width,height=self.height)
        self.frame_1.pack()
        self.frame_1.place(anchor='center', relx=0.5, rely=0.5)
Opening the Image
Let’s create a method named `open_image`. This method will trigger the Tkinter dialog box, enabling the user to choose an image file from the available options, which include ‘.jpg,’ ‘jpeg,’ and ‘.png’ formats.
    # Onen an Image
    def open_image(self):
        self.clear_screen()
        self.Image_Path =
        filedialog.askopenfilename(title = "Select an Image",
        filetypes = (("Image files", "*.jpg *.jpeg *.png"),))
        if len(self.Image_Path) != 0:
            self.image_name = os.path.basename(self.Image_Path)
            if self.image_name != '':
                self.show_image()
Showing the Image
After selecting the image file, we should display it in the application window. To do so, here, we will define a method called `show_image`.
    # Show the selected Image
    def show_image(self):
        image = Image.open(self.Image_Path)
        resized_image = image.resize((self.width, self.height))

        # Create an object of tkinter ImageTk
        self.img = ImageTk.PhotoImage(resized_image)

        # Create a Label Widget to display the text or Image
        label = Label(self.frame_1, image=self.img)
        label.pack()
The `show_image` method opens the image located at the path stored in the ‘Image_Path‘ attribute, resizes the image to fit within the window frame, and then displays it within the application window by utilizing the ‘ImageTk.PhotoImage‘ class.
Rotating Clockwise and Save
Let’s define a method named `rotate_right` to perform a 90-degree clockwise rotation of an image and also save the rotated image.
    # Method to rotate the image 90-degree clockwise
    def rotate_right(self):
        if self.image_name == None:
            pass
        else:
            data = cv2.imread(self.Image_Path)
            self.rot_image = cv2.rotate(data, cv2.ROTATE_90_CLOCKWISE)
            cv2.imwrite(self.Image_Path, self.rot_image)
            self.clear_screen()
            self.show_image()
This method uses OpenCV’s `cv.rotate` function to perform image rotation. Within this function, we specify the argument `cv2.ROTATE_90_CLOCKWISE` to achieve a 90-degree clockwise image rotation. Subsequently, the image is saved using the `cv2.imwrite` function.
Rotating Anti-Clockwise and Save
We’ve defined a method for a 90-degree clockwise rotation, linked to the ‘Right’ button. Now, let’s create a similar method called `rotate_left` for a 90-degree counterclockwise image rotation.
    # Method to rotate the image 90-degree anti-clockwise
    def rotate_left(self):
        if self.image_name == None:
            pass
        else:
            data = cv2.imread(self.Image_Path)
            self.rot_image = cv2.rotate(data, cv2.ROTATE_90_COUNTERCLOCKWISE)
            cv2.imwrite(self.Image_Path, self.rot_image)
            self.clear_screen()
            self.show_image()
The functionality of this method is nearly identical to the previous one, with the exception that we specify the `cv2.ROTATE_90_COUNTERCLOCKWISE` argument. This method will be associated with the ‘Left’ button.
Declaring Miscellaneous Methods
Now, let’s declare a method called `clear_screen`, which will be utilized multiple times within the program to clear the application window. Additionally, we’ll create two more methods, `about` and `Exit`, to establish connections with the ‘About’ and ‘Exit’ buttons in the menu bar.
    # Remove all widgets from the frame_1
    def clear_screen(self):
        for widget in self.frame_1.winfo_children():
            widget.destroy()

    # About window
    def about(self):
        messagebox.showinfo("Image Rotator",
        "Image Rotator AppnDeveloped by Subhankar Rakshit")

    # It destroys the main GUI window of the
    # application
    def Exit(self):
        self.window.destroy()
Initializing the Application
In the main part of your code, create an instance of the `Image_Rotator` class to build the GUI, and then start the main loop.
if __name__ == "__main__":
    root = Tk()

    img = None
    rot_image = None
    image_name = None
    image_path = None

    # Creating a Image_Rotator class object
    obj = Image_Rotator(root)
    root.mainloop()
In this block of code, we check if the script is being run as the main program (`__name__ == “__main__”`). This ensures that the code inside this block only runs when the script is executed, not when it’s imported as a module.
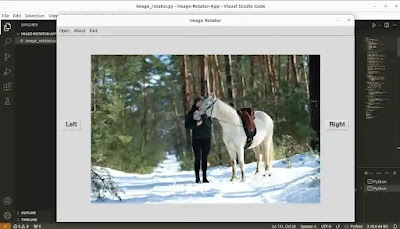
Output
Watch the complete video to understand how this Image Rotator App operates.
Summary
In this article, we built an Image Rotator Application in Python using the Tkinter library. This application is capable of opening, viewing, and rotating images clockwise and anti-clockwise.
Rotating an image using this application is as easy as 1-2-3-4. First, you have to select the image from the menu bar, and then you can easily perform the desired rotation using the ‘Left’ and ‘Right’ buttons.
Whether you’re a photographer, content creator, or just someone who appreciates the art of visual storytelling, this tool equips you with the ability to share your images with precision and expertise.
For more interesting Tkinter examples, please explore the dedicated page exclusively made for Python Projects.
Happy Coding!