![]()

Introduction
Ever bump into someone on the street and instantly recognize them, even after years? Pretty cool, right? But what if machines could do the same? Not just robots in sci-fi movies, but real-world tech that can pick you out of a crowd just by looking at your face.
That’s the magic of face recognition, and it’s not just some futuristic dream anymore. It’s already out there, securing buildings, tracking employees, and even helping unlock your phone. And guess what? You can learn to build your own Face Recognition Project in Python.
In this tutorial, we’ll dive into the world of faces and code. We’ll learn how to train a computer to recognize your friends, family, or even that pesky neighbor who keeps borrowing your lawnmower (without asking!). So buckle up, grab your Python skills, and get ready to unleash your inner facial recognition superhero.
Understanding Face Recognition
Have you ever come across face recognition technology? It’s a fascinating biometric method that identifies and verifies individuals based on their unique facial features. Essentially, it breaks down key attributes like the distance between the eyes, the shape of the nose, and the lines of the face to create a distinct facial signature. This signature is then cross-referenced with a database of known faces to confirm a match. It’s pretty impressive how technology has advanced, isn’t it?
The Power of Python in Face Recognition
You know, Python is like the rockstar of programming languages when it comes to crafting face recognition systems. Its simplicity and versatility make it an ideal choice. Plus, there’s this amazing world of libraries, like OpenCV and dlib, that Python brings to the table. These libraries pack some serious punch, offering robust tools for image processing and machine learning. They basically make it a breeze to bring in those complex algorithms.
Building a Face Recognition Project in Python
Alright, let’s get into the nitty-gritty of creating a face recognition project in Python. To start things off, we’ll create a Python program to set up a live face recognition system. This cool system will tap into our computer’s webcam, capturing those real-time video frames.
Our little program is on a mission to spot faces in those frames and match them up with the ones we’ve already stored. Exciting stuff, right? Here are the steps:
Step 1: Requirements and Installations
To kick off our project, we need to install some essential Python libraries. OpenCV, cmake, dlib, face-recognition, and numpy are the primary libraries we will be using. Open your terminal or command prompt and run the following commands:
Note that, before installing the face_recognition library, it’s necessary to install two other libraries—namely, cmake and dlib.
pip install opencv-python
pip install cmake
pip install dlib
pip install numpy
pip install face_recognition
Now, let’s get our workspace organized:
- Create a separate folder for this Python project named “Face-Recognition”.
- Establish one additional sub-directory within this folder with the title ‘Images’.
- Store the images into the ‘Images’ folder you want to recognize through the WebCam.
- Within the main folder, declare a Python file named
face-recog.py.
Step 2: Gathering a Dataset
Every good face recognition project starts with a robust dataset. In our case, we need a collection of images containing the faces we want our face recognition system to recognize. Just to show you some examples, I’ve taken some faces from my favourite web series, money heist’s characters and it will be our dataset. We’ll use this dataset to train our face recognition model. Feel free to grab these images – just hit the download button below!
Note that, You can also collect a diverse set of images containing the faces of the individuals you want to recognize. Make sure to include variations in lighting conditions, angles, and expressions.
Step 3: Import the Modules
Let’s start writing your code by importing the following modules.
import face_recognition as fr
import numpy as np
import os
import cv2
Step 4: Encoding the Images
def encode_faces():
    encoded_data = {}

    for dirpath, dnames, fnames in os.walk("./Images"):
        for f in fnames:
            if f.endswith(".jpg") or f.endswith(".png"):
                face = fr.load_image_file("Images/" + f)
                encoding = fr.face_encodings(face)[0]
                encoded_data[f.split(".")[0]] = encoding

    # return encoded data of images
    return encoded_data
Here, we define a function, encode_faces. Basically, what it does is encode faces from images stored in the ‘Images’ folder using face recognition magic. Then, it creates a dictionary (encoded_data) where filenames are keys, and corresponding face encodings are values.
The function returns this encoded data.
Step 5: Detect and Recognize the Faces
Let’s define a function called detect_face to detect and recognize the faces through the webcam.
def detect_faces():
    faces = encode_faces()
    encoded_faces = list(faces.values())
    faces_name = list(faces.keys())

    video_frame = True
    # Capturing video through the WebCam
    # Real Time Video Streams
    video = cv2.VideoCapture(0)
    while True:
        ret, frame = video.read()

        if video_frame:
            face_locations = fr.face_locations(frame)
            unknown_face_encodings = fr.face_encodings(frame, face_locations)

            face_names = []
            for face_encoding in unknown_face_encodings:
                # Comapring faces
                matches = fr.compare_faces(encoded_faces, face_encoding)
                name = "Unknown"

                face_distances = fr.face_distance(encoded_faces, face_encoding)
                best_match_index = np.argmin(face_distances)
                if matches[best_match_index]:
                    name = faces_name[best_match_index]

                face_names.append(name)

        video_frame = not video_frame
Firstly, the detect_face function encodes faces and their names through the encode_faces function. Then, it sets up video capture and enters a continuous loop to process video frames.
During each iteration, it detects face locations, extracts unknown face encodings, and compares them with the pre-encoded faces. The code assigns names to recognized faces based on the best match and updates a list of face names.
To keep things dynamic, the loop strategically alternates between processing frames, ensuring a smooth and controlled display throughout the entire operation.
Step 6: Drawing Bounding Boxes for Your Face Recognition Project
Let’s enhance our script by drawing bounding boxes around the detected faces and showing the name of the person. This will make the face recognition process visually appealing and informative.
        for (top, right, bottom, left), name in zip(face_locations, face_names):
            # Draw a rectangular box around the face
            cv2.rectangle(frame, (left-20, top-20), (right+20, bottom+20), (0, 255, 0), 2)
            # Draw a Label for showing the name of the person
            cv2.rectangle(frame, (left-20, bottom -15), (right+20, bottom+20), (0, 255, 0), cv2.FILLED)
            font = cv2.FONT_HERSHEY_DUPLEX
            # Showing the name of the detected person through the WebCam
            cv2.putText(frame, name, (left -20, bottom + 15), font, 0.85, (255, 255, 255), 2)
Step 7: Real-Time Video Display and Quit Control
Let’s showcase a real-time video feed. This piece of code will continually display video frames and listen for user input. You need to press the ‘q’ key to close the gracefully.
        cv2.imshow('Video', frame)
        code = cv2.waitKey(1)
        # Press 'q' for close the video frame
        if code == ord('q'):
            break

    cv2.destroyAllWindows()
Step 8: Putting it All Together
Let’s start recognizing faces! We’ll use your webcam and the detect_faces function to get it going.
if __name__ == "__main__":
    detect_faces()
In this block of code, we check if the script is being run as the main program (`__name__ == “__main__”`). This ensures that the code inside this block only runs when the script is executed, not when it’s imported as a module.
Output
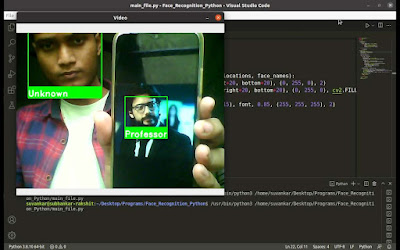
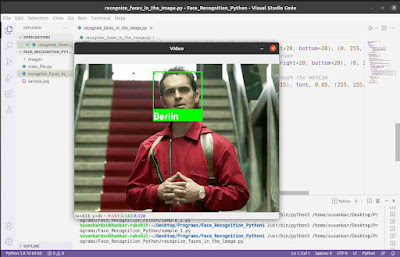
Face Recognition in an Image
Now, let’s take what we’ve covered with recognizing faces in live video streams from the webcam and apply it to images. The code for this is pretty much the same as before, with just a small tweak highlighted in the yellow line.
import face_recognition as fr
import numpy as np
import os
import cv2

def encode_faces():
    encoded_data = {}

    for dirpath, dnames, fnames in os.walk("./Images"):
        for f in fnames:
            if f.endswith(".jpg") or f.endswith(".png"):
                face = fr.load_image_file("Images/" + f)
                encoding = fr.face_encodings(face)[0]
                encoded_data[f.split(".")[0]] = encoding

    # return encoded data of images
    return encoded_data

# Function for face detection & recognition
def detect_faces(image):
    faces = encode_faces()
    encoded_faces = list(faces.values())
    faces_name = list(faces.keys())

    # Reading the image data
    frame = cv2.imread(image, 1)
    # detect faces in the image
    face_locations = fr.face_locations(frame)
    unknown_face_encodings = fr.face_encodings(frame, face_locations)

    face_names = []
    for face_encoding in unknown_face_encodings:
        # Comapring faces
        matches = fr.compare_faces(encoded_faces, face_encoding)
        name = "Unknown"

        face_distances = fr.face_distance(encoded_faces, face_encoding)
        best_match_index = np.argmin(face_distances)
        if matches[best_match_index]:
            name = faces_name[best_match_index]

        face_names.append(name)

        for (top, right, bottom, left), name in zip(face_locations, face_names):
            # Draw a rectangular box around the face
            # cv2.rectangle image
            cv2.rectangle(frame, (left-20, top-20), (right+20, bottom+20), (0, 255, 0), 2)
            # Draw a Label for showing the name of the person
            cv2.rectangle(frame, (left-20, bottom -15), (right+20, bottom+20),
            (0, 255, 0), cv2.FILLED)
            font = cv2.FONT_HERSHEY_DUPLEX
            # Showing the name of the detected person through the WebCam
            cv2.putText(frame, name, (left -20, bottom + 15), font, 0.85, (255, 255, 255), 2)

    while True:
        cv2.imshow('Video', frame)
        code = cv2.waitKey(1)
        # Press 'q' for close the video frame
        if code == ord('q'):
            break

    cv2.destroyAllWindows()

if __name__ == "__main__":
    detect_faces("sample.jpg")
Here, we’re handing over a sample image file (“sample.jpg”) to the “detect_faces” function to spot any faces in it. Make sure the image file sits right there in the main directory alongside your Python program file. Easy, right?
Output
Applications of Face Recognition
This powerful technology has a wide range of applications, with some surprising potential benefits lurking around every corner. Let’s explore some of the ways face recognition is already making a difference:
- Access control and security systems
- Identity verification for online services
- Attendance tracking in educational institutions and workplaces
- Automated surveillance and monitoring
- Personalized marketing and customer experience
These are just a few examples of how face recognition is transforming various aspects of our lives. As the technology continues to evolve, we can expect even more innovative applications to emerge, reshaping our interactions with the world around us.
Summary
In this tutorial, you learned how you can create a face recognition system using our trusty programming language, Python. At the very first, we make our system suitable for building such a face recognition project. We installed a few Python libraries including ‘cmake’, ‘dlib’, ‘OpenCV’, ‘face-recognition’, ‘numpy’, etc.
Then, we got to work building two Python programs. This first one is our real-time face detective! It taps into your webcam’s video stream and identifies any faces it spots, comparing them to a lineup of known faces we’ve stored in its memory.
The second one is a master of still images. ️ Give it a photo, and it’ll pinpoint and recognize any faces within, using the same knowledge base as its real-time counterpart.
Feeling inspired to assemble your own face recognition team? Grab your Python toolkit and let’s get coding! Share your progress in the comments—I’m here to cheer you on!
Skip the search, jump to the fun! Explore diverse Python projects with ready-made code – Python Projects! Below are a few instances to spark your interest.
- A face recognition-based login system using Python
- Student Management System Project in Python with MySQL
- Library Management System Project in Python with MySQL
- Contact Management System Project in Python with MySQL
Happy Coding!