![]()

Introduction
In this tutorial, we will create a Basic Calculator in Python using the Tkinter library. It will allow you to perform basic arithmetic operations such as addition, subtraction, multiplication, and division.
Calculators are everyday tools that many of us take for granted, but understanding how to build one from scratch can be a joyful experience. By the end of this tutorial, you’ll not only have a functional calculator but also a deeper understanding of the capabilities of Python and Tkinter.
So, whether you’re a Python newbie looking to brush up on your programming skills or an experienced developer looking for a fun project, let’s dive into the world of GUI development and create a calculator you can proudly call your own.
Requirements
Before we begin, make sure you have Python installed on your system. You will also need Tkinter, which comes pre-installed with most Python distributions. If you don’t have Tkinter, you can install it using pip:
pip install tk
Start Writing the Code
Create a separate directory for this project, naming it “Calculator_App”. Within this directory, generate a fresh Python file named “calculator.py”, and open it with your favorite text editor. Now start writing the code.
Import Tkinter
First, import the Tkinter library and create the main application window.
import tkinter as tk

# Create the main application window
root = tk.Tk()
root.title("Calculator")
Design the Calculator Interface
Now, let’s design the calculator interface by adding buttons and a display area for the input and output.
# Create an Entry widget for the display
display = tk.Entry(root, width=20, font=("Arial", 20))
display.grid(row=0, column=0, columnspan=4, ipadx= 46, ipady= 40)

# Define button labels
button_labels = [
    '7', '8', '9', '/',
    '4', '5', '6', '*',
    '1', '2', '3', '-',
    '0', '.', '=', '+'
]

# Create buttons and place them in a grid
row, col = 1, 0
buttons = []
for label in button_labels:
    button = tk.Button(root, text=label, width=5, height=2, font=("Arial", 16))
    button.grid(row=row, column=col, padx=5, pady=5)
    buttons.append(button)
    col += 1
    if col > 3:
        col = 0
        row += 1
In the above code, we’ve created an Entry widget for the display and a grid of buttons labeled with numbers, arithmetic operators, and the equals sign.
Create the Calculator Functions
Next, let’s define the functions that handle the calculator’s operations when buttons are clicked.
def button_click(event):
    # Get the current text in the display
    current = display.get()

    # Get the label of the button that was clicked
    button = event.widget
    text = button['text']

    if text == '=':
        try:
            # Evaluate the expression and display the result
            result = eval(current)
            display.delete(0, tk.END)
            display.insert(tk.END, str(result))
        except:
            # Handle errors (e.g., division by zero)
            display.delete(0, tk.END)
            display.insert(tk.END, "Error")
    else:
        # Append the button's text to the current display text
        display.insert(tk.END, text)

def clear():
    # Clear the display
    display.delete(0, tk.END)
In the ‘button_click‘ function, we handle button clicks. When the ‘=‘ button is clicked, we evaluate the expression in the entry widget and display the result. If an error occurs (e.g., division by zero), we display “Error.” For other buttons, we simply append their text to the current display text.
The ‘clear‘ function is used to clear the display when the ‘C’ button is clicked.
Binding Functions to Buttons
Finally, we need to bind the ‘button_click‘ function to the calculator buttons and the ‘clear‘ function to the ‘C’ button.
# Bind the button_click function to the calculator buttons
for button in buttons:
    button.bind("<Button-1>", button_click)

# Create a clear button and bind the clear function
clear_button = tk.Button(root, text="C", width=5, height=2, font=("Arial", 16), command=clear)
clear_button.grid(row=5, column=0, columnspan=4, padx=5, pady=5)
Running the Calculator
Now that we’ve defined our calculator interface and functions, we can run the calculator by starting the Tkinter main loop.
root.mainloop()
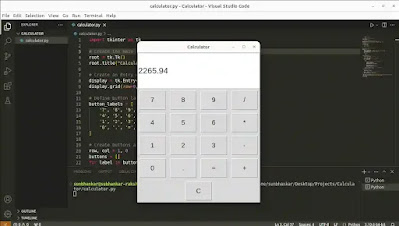
Output
Summary
In this tutorial, we’ve created a basic calculator using Python programming language. We used the Tkinter library to build the graphical interface of this app. This tutorial guides you through each step of the process, from designing the user interface to binding functions to buttons.
Whether you’re a beginner looking to enhance your programming proficiency or an experienced developer seeking a satisfying project, building a calculator app in Python with Tkinter is an excellent way to gain hands-on experience in GUI development.
So, roll up your sleeves, open your code editor, and embark on this exciting journey to create a user-friendly calculator application.
For more interesting Tkinter examples, please explore the dedicated page exclusively for Python Projects.
Happy Calculating!