![]()
Introduction
Countdown timers aren’t just for defusing bombs in Hollywood movies. They’re ubiquitous tools in our daily lives, from timing your morning jog to tracking pizza delivery. But why settle for a boring stopwatch when you can whip up a sleek, customizable countdown timer in Python?
This tutorial will guide you through creating a feature-packed countdown timer using the powerful Tkinter library. Imagine:
- Start and pause the timer at will.
- Set the countdown duration in seconds, minutes, or even hours, catering to any task.
- Enjoy a visually appealing interface that’s both informative and aesthetically pleasing.
But that’s not all! We’ll also explore adding sound effects or notifications to mark the timer’s end.
So, grab your virtual coding apron and get ready to breathe life into your countdown fantasies! Buckle up, and let’s dive into the exciting world of Python and Tkinter timer magic.
Read Also: Create a Meditation App in Python with Tkinter
Requirements and Installations
If Python isn’t already a resident on your system, fear not! Grab the latest version from their website (https://www.python.org/). Once settled, remember to install the playsound library using the command below. Don’t worry about Tkinter; it’s pre-installed with Python!
pip install playsoundSetting Up the Project
Before we unleash our Python Countdown Timer, let’s get our workspace organized:
- Create a separate folder for this Python project named
CountDownTimer. - Within this folder, declare a Python file named
CountDown.py. - Download the provided zip file. Unzip it to reveal a folder named
Ringtones. Welcome this folder into theCountDownTimerdirectory, ready to herald the timer’s end with a symphony of sounds.
Now your project is primed for coding adventures.
Import the modules
Let’s start writing your code by importing these modules.
import time
from tkinter import *
import multiprocessing
from tkinter import ttk, messagebox
from playsound import playsound
from threading import *
Lists of hours and minutes
Let’s create two Python lists that will hold the available hours and minutes for users to select.
# Hour list
hour_list = [0, 1, 2, 3, 4, 5, 6, 7, 8, 9,
10, 11, 12, 13, 14, 15, 16, 17, 18, 19,
20, 21, 22, 23, 24]

# Minute List
min_sec_list = [0, 1, 2, 3, 4, 5, 6, 7, 8,
9, 10, 11, 12, 13, 14, 15, 16, 17, 18, 19,
20, 21, 22, 23, 24, 25, 26, 27, 28, 29, 30,
31, 32, 33, 34, 35, 36, 37, 38, 39, 40, 41,
42, 43, 44, 45, 46, 47, 48, 49, 50, 51, 52,
53, 54, 55, 56, 57, 58, 59,]
Define the ‘CountDown’ class
Now we’ll create a class named CountDown. It will act as a neat container for our timer’s features and behaviors.
class CountDown:Create the Main Application Window
The __init__ method will create the main application window for us. Within this method, we define the window dimensions, title, resizable preferences, and all components essential for configuring the countdown timer, such as labels, buttons, and combo boxes.
    def __init__(self, root):
        self.window = root
        self.window.geometry("480x320+0+0")
        self.window.title('CountDown Timer')
        # Tkinter window background color
        self.window.configure(bg='gray35')
        # Fixing the Window length constant
        self.window.resizable(width = False, height = False)

        # Declaring a variable to pause the countdown time
        self.pause = False

        # The Start and Pause buttons are placed
        # inside this frame
        self.button_frame = Frame(self.window, bg="gray35", \
        width=240, height=40)
        self.button_frame.place(x=230, y=150)
        # This frame is used to show the countdown time label
        self.time_frame = Frame(self.window, bg="gray35", \
        width=480, height=120).place(x=0, y=210)

        # Tkinter Labels
        time_label = Label(self.window, text="Set Time",
        font=("times new roman",20, "bold"), bg='gray35',fg='yellow')
        time_label.place(x=180, y=30)

        hour_label = Label(self.window, text="Hour",
        font=("times new roman",15), bg='gray35', fg='white')
        hour_label.place(x=50, y=70)

        minute_label = Label(self.window, text="Minute",
        font=("times new roman",15), bg='gray35', fg='white')
        minute_label.place(x=200, y=70)

        second_label = Label(self.window, text="Second",
        font=("times new roman",15), bg='gray35', fg='white')
        second_label.place(x=350, y=70)
        # ===========================================

        # Tkinter Comboboxes
        # Combobox for hours
        self.hour = IntVar()
        self.hour_combobox = ttk.Combobox(self.window, width=8,
        height=10, textvariable=self.hour,
        font=("times new roman",15))
        self.hour_combobox['values'] = hour_list
        self.hour_combobox.current(0)
        self.hour_combobox.place(x=50,y=110)

        # Combobox for minutes
        self.minute = IntVar()
        self.minute_combobox = ttk.Combobox(self.window, width=8,
        height=10, textvariable=self.minute,
        font=("times new roman",15))
        self.minute_combobox['values'] = min_sec_list
        self.minute_combobox.current(0)
        self.minute_combobox.place(x=200,y=110)

        # Combobox for seconds
        self.second = IntVar()
        self.second_combobox = ttk.Combobox(self.window, width=8,
        height=10, textvariable=self.second,
        font=("times new roman",15))
        self.second_combobox['values'] = min_sec_list
        self.second_combobox.current(0)
        self.second_combobox.place(x=350,y=110)
        # ===========================================

        # Tkinter Buttons
        # Cancel button
        cancel_button = Button(self.window, text='Cancel',
        font=('Helvetica',12), bg="white", fg="black",
        command=self.Cancel)
        cancel_button.place(x=70, y=150)

        # Set Time Button
        # When the user presses this button
        # the 'Start' and 'Pause' button will
        # show inside the 'self.button_frame' frame
        set_button = Button(self.window, text='Set',
        font=('Helvetica',12), bg="white", fg="black",
        command=self.Get_Time)
        set_button.place(x=160, y=150)
The Cancel Method
Now, we’ll define a method named Cancel to halt the program’s execution and gracefully close the application window.
    def Cancel(self):
        self.pause = True
        self.window.destroy()
Get the time from the user
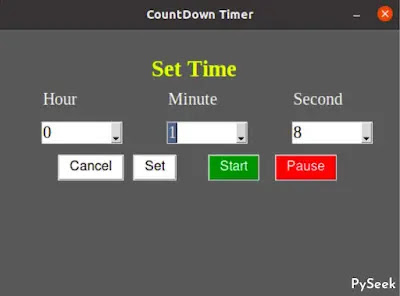
In the image above, notice our Countdown timer featuring a ‘Set‘ button. To begin, choose a time from the drop-down options. Once your desired time is selected, press the ‘Set’ button. This button is connected to a method named Get_Time, designed to capture the user’s selected time and initiate subsequent actions.
If the user tries to set the default value (0:0:0) as the timer, the program will kindly prompt a warning message, encouraging the selection of a measurable time.
    def Get_Time(self):
        self.time_display = Label(self.time_frame,
        font=('Helvetica', 20 , "bold"),
        bg = 'gray35', fg = 'yellow')
        self.time_display.place(x=130, y=210)

        try:
            # Total amount of time in seconds
            h = (int(self.hour_combobox.get())*3600)
            m = (int(self.minute_combobox.get())*60)
            s = (int(self.second_combobox.get()))
            self.time_left = h + m + s

            # If the user tries to set the default time(0:0:0) then
            # A warning message will display
            if s == 0 and m == 0 and h == 0:
                messagebox.showwarning('Warning!',\
                'Please select a right time to set')
            else:
                # Start Button
                start_button = Button(self.button_frame, text='Start',
                font=('Helvetica',12), bg="green", fg="white",
                command=self.Threading)
                start_button.place(x=20, y=0)

                # Pause Button
                pause_button = Button(self.button_frame, text='Pause',
                font=('Helvetica',12), bg="red", fg="white",
                command=self.pause_time)
                pause_button.place(x=100, y=0)
        except Exception as es:
            messagebox.showerror("Error!", f"Error due to {es}")
Create a Thread
Now, create a separate thread using the Python’s threading module for handling the following tasks:
- Showing the Remaining time.
- Handling Start and Pause functions perfectly.
It will help to run all the functionality of the Timer smoothly.
    def Threading(self):
        # Killing a thread through "daemon=True" isn't a good idea
        self.x = Thread(target=self.start_time, daemon=True)
        self.x.start()
Clear the Screen
Now, let’s create a method named Clear_Screen. Despite what the name might imply, its role isn’t to clear the entire application screen. Our Countdown Timer offers ‘Start’ and ‘Pause’ buttons to pause and resume the timer but these two buttons remain hidden initially. When the set button is pressed, these two buttons become visible.
The Clear_Screen method specifically works to remove only the ‘Start’ and ‘Pause’ buttons from the screen. I hope this clarifies the scenario for you.
    def Clear_Screen(self):
        for widget in self.button_frame.winfo_children():
            widget.destroy()
Start the Timer
In this section, we’re going to create a method called start_time, connected to the ‘Start’ button, responsible for starting the Countdown time.
Take note that initially, we’ve set the value of “self.pause” to False. In the start_time method, the while loop continuously monitors whether the status of self.pause is True or not. When it becomes True (indicating that the pause button has been pressed), the while loop breaks.
    def start_time(self):
        self.pause = False
        while self.time_left > 0:
            mins, secs = divmod(self.time_left, 60)

            hours = 0
            if mins > 60:
                # hour minute
                hours, mins = divmod(mins, 60)

            self.time_display.config(text=f"Time Left: {hours}: {mins}: {secs}")
            self.time_display.update()
            # sleep function: for 1 second
            time.sleep(1)
            self.time_left = self.time_left -1
            # When the time is over, a piece of music will
            # play in the background
            if self.time_left <= 0:
                process = multiprocessing.Process(target=playsound,
                args=('Ringtones/romantic.mp3',))
                process.start()
                messagebox.showinfo('Time Over', 'Please ENTER to stop playing')
                process.terminate()
                # Clearing the 'self.button_frame' frame
                self.Clear_Screen()
            # if the pause button is pressed,
            # the while loop will break
            if self.pause == True:
                break
Pause the Timer
Now, we’ll define a method called pause_time, associated with the ‘Pause’ button. When this button is pressed, it triggers a call to this function, setting “self.pause = True.” As a result, the while loop in the start_time method is interrupted, effectively pausing the timer. In this situation, only the remaining time continues to be displayed on the screen.
    def pause_time(self):
        self.pause = True

        mins, secs = divmod(self.time_left, 60)
        hours = 0
        if mins > 60:
            # hour minute
            hours, mins = divmod(mins, 60)

        self.time_display.config(text=f"Time Left: {hours}: {mins}: {secs}")
        self.time_display.update()
Initializing the Application
In the main part of your code, create an instance of the CountDown class to build the GUI, and then start the main loop.
if __name__ == "__main__":
    root = Tk()
    # Creating a CountDown class object
    obj = CountDown(root)
    root.mainloop()
In this block of code, we check if the script is being run as the main program (`__name__ == “__main__”`). This ensures that the code inside this block only runs when the script is executed, not when it’s imported as a module.
Output
See it in action to fully grasp how to operate the app.
Summary
Congratulations! You’ve successfully crafted a versatile Countdown Timer in Python using the Tkinter library, equipped with start, pause, and resume capabilities. Instead of a boring beep, it plays a symphony of sounds with a friendly pop-up when time’s up! It’s easy to use, visually appealing, and ready to tackle diverse time-keeping tasks.
Ready for More Python Tkinter Adventures?
- Meditation App in Python: Helps to Practice Deep Breathing
- Test Your Typing Speed with Python – Tkinter Project
- Create an Advanced Alarm Clock Using Python Tkinter
- Image to Pencil Sketch Converter in Python – Tkinter Project
Engage in the countdown community! Share your thoughts, seek guidance, and connect with fellow Python enthusiasts in the comments below.
Happy Coding!