![]()

Introduction
In our fast-paced world, every minute counts. Missing an important appointment, meeting, or event can have major consequences. But what if you could ditch the unreliable snooze button and take control of your mornings with a personalized alarm clock that works for you?
Ditch the buzzing plastic rectangle and craft your own alarm clock using Python! ⏰. With its powerful and versatile libraries, Python makes it easy to create a custom alarm clock application that perfectly fits your needs. No more generic beeps or jarring buzzes! Imagine waking up to your favorite music, gentle nature sounds, or even a motivational quote.
In this tutorial, we’ll guide you step-by-step through the process of building your very own alarm clock using Tkinter, the standard GUI library for Python. You’ll learn how to:
- Set multiple alarms
- Choose from a variety of wake-up sounds and notifications.
- Design a user-friendly interface that matches your style
Whether you’re a seasoned programmer or just starting out, this tutorial is for you. With clear instructions and plenty of code examples, you’ll be building your own Python alarm clock in no time. So, say goodbye to missed deadlines and hello to a more productive and organized you!
Ready to take control of your mornings? Let’s get started!
👉Read Also: Creating a Music Player in Python using VLC and Tkinter🎧
Key Features

- See the time and date right away on the home screen.
- Set your alarm easily:
- Click “Set Alarm” to open the settings.
- Choose the time you want using drop-down menus.
- Pick a ringtone and listen to it before you set it.
- Add a special message to show when the alarm goes off.
- Start your alarm with just one tap of the “Start” button.
Requirements and Installations
If Python isn’t already a resident on your system, fear not! Grab the latest version from their website (https://www.python.org/). Once settled, remember to install Pillow and playsound libraries using the command below. Don’t worry about Tkinter; it’s pre-installed with Python!
pip install Pillow
pip install playsound
Setting Up the Project
Before we unleash our Python Alarm Clock, let’s get our workspace organized:
- Create a separate folder for this Python project named “Alarm-Clock”.
- Establish two additional sub-directories within this folder titled ‘Images’ and ‘Ringtones’.
- Within the main folder, declare a Python file named “alarm_clock.py”.
- Get the required image and music files by using the ‘Download’ button below.
Now your project is primed for coding adventures.
Import the modules
Let’s start writing your code by importing these modules.
import time
from tkinter import *
from PIL import ImageTk
from tkinter import ttk, messagebox
from playsound import playsound
import multiprocessing
from datetime import datetime
from threading import *
Lists of hours and minutes
Let’s create three Python lists that will hold the available hours, minutes, and ringtone names for users to select.
hours_list = ['00', '01', '02', '03', '04', '05', '06', '07',
		'08', '09', '10', '11', '12', '13', '14', '15',
		'16', '17', '18', '19', '20', '21', '22', '23', '24']

minutes_list = ['00', '01', '02', '03', '04', '05', '06', '07',
		'08', '09', '10', '11', '12', '13', '14', '15',
		'16', '17', '18', '19', '20', '21', '22', '23',
		'24', '25', '26', '27', '28', '29', '30', '31',
		'32', '33', '34', '35', '36', '37', '38', '39',
		'40', '41', '42', '43', '44', '45', '46', '47',
		'48', '49', '50', '51', '52', '53', '54', '55',
		'56', '57', '58', '59']

ringtones_list = ['mom_calling', 'nice_wake_up', 'romantic', 'twirling_intime', 'wakeup_alarm_tone']
Select the Ringtones
In the previous section, we defined the names of the ringtones. Now, you need to specify the file path for each of these ringtones.
Note that we have set up a ‘Ringtones‘ folder which contains several mp3 files for ringtones. In this section, we outline the file path within the ‘ringtones_path‘ dictionary.
ringtones_path = {
    'mom_calling': 'Ringtones/mom_calling.mp3',
    'nice_wake_up': 'Ringtones/nice_wake_up.mp3',
    'romantic': 'Ringtones/romantic.mp3',
    'twirling_intime': 'Ringtones/twirling_intime.mp3',
    'wakeup_alarm_tone': 'Ringtones/wakeup_alarm_tone.mp3'
}
Define the ‘AlarmClock’ class
Now we’ll create a class named AlarmClock. It will act as a neat container for our alarm clock’s features and behaviors.
class AlarmClock:
Create the Main Application Window
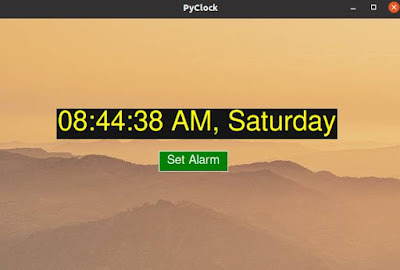
The __init__ method will create the main application window for us. Within this method, we define the window dimensions, title, and resizable settings. Additionally, we display the current time and day in a Tkinter label within this window, along with a button that, when clicked, opens the configuration window to choose the alarm time.
    def __init__(self, root):
        self.window = root
        self.window.geometry("680x420+0+0")
        self.window.title("PyClock")
        self.window.resizable(width = False, height = False)

        # Background image of the first window.
        self.bg_image = ImageTk.PhotoImage(file="Images/image_1.jpg")
        self.background = Label(self.window, image=self.bg_image)
        self.background.place(x=0,y=0,relwidth=1,relheight=1)

        # Display Label shows the current time in the
        # first window
        self.display = Label(self.window, font=('Helvetica', 34),
        bg = 'gray8', fg = 'yellow')
        self.display.place(x=100,y=150)

        self.show_time()

        set_button = Button(self.window, text="Set Alarm",
        font=('Helvetica',15), bg="green", fg="white",
        command=self.set_alarm)
        set_button.place(x=270, y=220)
In the code above, we’ve created the main application window, displayed the current time, and added a “Set Alarm” button that will call the `set_alarm` method when clicked. We also called `show_time` method for continuous update of the time label.
Display the Current Time
Let’s define a method called `show_time` to continuously display the current time, updating it every 100 milliseconds until the user initiates a different action.
    # Method to show the current time in the first window
    def show_time(self):
        current_time = time.strftime('%H:%M:%S %p, %A')
        # Placing the time format level.
        self.display.config(text = current_time)
        self.display.after(100, self.show_time)
Create the Alarm Window
Now, let’s define the `set_alarm` method that will open a new window for setting the alarm:
    def set_alarm(self):
        self.alarm_window = Tk()
        self.alarm_window.title("Set Alarm")
        self.alarm_window.geometry("680x420+200+200")

        # Hour Label
        hours_label = Label(self.alarm_window, text="Hours",
        font=("times new roman",20))
        hours_label.place(x=150, y=50)

        #  Minute Label
        minute_label = Label(self.alarm_window, text="Minutes",
        font=("times new roman",20))
        minute_label.place(x=450, y=50)

        # Hour Combobox
        self.hour_var = StringVar()
        self.hour_combo = ttk.Combobox(self.alarm_window,
        width=10, height=10, textvariable=self.hour_var,
        font=("times new roman",15))
        self.hour_combo['values'] = hours_list
        self.hour_combo.current(0)
        self.hour_combo.place(x=150,y=90)

        # Minute Combobox
        self.minute_var = StringVar()
        self.minute_combo = ttk.Combobox(self.alarm_window,
        width=10, height=10, textvariable=self.minute_var,
        font=("times new roman",15))
        self.minute_combo['values'] = minutes_list
        self.minute_combo.current(0)
        self.minute_combo.place(x=450,y=90)

        # Ringtone Label.
        ringtone_label = Label(self.alarm_window, text="Ringtones",
        font=("times new roman",20))
        ringtone_label.place(x=150, y=130)

        # Ringtone Combobox(Choose the ringtone).
        self.ringtone_var = StringVar()
        self.ringtone_combo = ttk.Combobox(self.alarm_window,
        width=15, height=10, textvariable=self.ringtone_var,
        font=("times new roman",15))
        self.ringtone_combo['values'] = ringtones_list
        self.ringtone_combo.current(0)
        self.ringtone_combo.place(x=150,y=170)

        # Create an entry for setting a message
        message_label = Label(self.alarm_window, text="Message",
        font=("times new roman",20))
        message_label.place(x=150, y=210)

        self.message_var = StringVar()
        self.message_entry = Entry(self.alarm_window,
        textvariable=self.message_var, font=("times new roman",14), width=30)
        self.message_entry.insert(0, 'Wake Up')
        self.message_entry.place(x=150, y=250)

        # Test Button: For testing the ringtone music.
        test_button = Button(self.alarm_window, text='Test',
        font=('Helvetica',15), bg="white", fg="black", command=self.preview_alarm)
        test_button.place(x=150, y=300)

        # The Cancel Button: For cancel the alarm.
        cancel_button = Button(self.alarm_window,
        text='Cancel', font=('Helvetica',15), bg="white",
        fg="black", command=self.alarm_window.destroy)
        cancel_button.place(x=390, y=300)

        # The Start Button: For set the alarm time
        start_button = Button(self.alarm_window, text='Start',
        font=('Helvetica',15), bg="green", fg="white", command=self._threading)
        start_button.place(x=490, y=300)

        self.alarm_window.mainloop()
In the `set_alarm` method, we’ve created a new window with options to set the alarm time (hours and minutes), select an alarm sound, and enter a message for the alarm. The “Start” button will call the `_threading` method when clicked, and The “Test” button will allow you to listen to the chosen alarm ringtone before confirming your selection.
Preview the Alarm Sound
Now define a method named preview_alarm to test the selected ringtone.
    def preview_alarm(self):
        process = multiprocessing.Process(target=playsound,
        args=(ringtones_path[self.ringtone_combo.get()],))
        process.start()
        messagebox.showinfo('Playing...', 'press ENTER to stop playing')
        process.terminate()
In the `preview_alarm` method, we initiate a separate process by using ‘multiprocessing‘ module to play the music file.
Apply Threading
Create a different method `_threading` to call the `save_alarm` method.
    # Method for creating a thread
    def _threading(self):
        x = Thread(target=self.save_alarm)
        x.start()
In the `_threading` method, we used the ‘threading‘ module to create a separate thread responsible for invoking the `save_alarm` method, which handles the alarm configuration. This separate thread enables concurrent display of the real-time clock in the primary window.
Save the Alarm
Let’s define the `save_alarm` method to handle saving the alarm settings and playing the alarm sound:
    def save_alarm(self):
        alarm_time = f"{self.hour_combo.get()}:{self.minute_combo.get()}"
        messagebox.showinfo("Alarm Set", f"Alarm set for {alarm_time}")
        sound_name = self.ringtone_combo.get()
        message = self.message_entry.get()
        try:
            while True:
                # The current time is in 24 hour format
                current_time = datetime.now()
                # Converting the current time into hours and minutes
                current_time_format = current_time.strftime("%H:%M")
                if current_time_format == alarm_time:
                    process = multiprocessing.Process(target=playsound,
                    args=(ringtones_path[sound_name],))
                    process.start()
                    messagebox.showinfo("Alarm",f"{message}, It's {alarm_time}")
                    process.terminate()
                    break
        except Exception as es:
            messagebox.showerror("Error!", f"Error due to {es}")
In the `save_alarm` method, we calculate the time difference between the alarm time and the current time and schedule the alarm to play at the specified time. When the specified time is reached, the code will play the selected alarm sound and display the alarm message.
Initialize the Application
In the main part of your code, create an instance of the AlarmClock class to build the GUI, and then start the main loop.
if __name__ == "__main__":
    root = Tk()
    obj = AlarmClock(root)
    root.mainloop()
In this block of code, we check if the script is being run as the main program (`__name__ == “__main__”`). This ensures that the code inside this block only runs when the script is executed, not when it’s imported as a module.
Output
See it in action to fully grasp how to operate this alarm clock application.
Summary
Congrats! You’ve just built your own Python alarm clock! No more generic beeps or jarring buzzes. This alarm clock using Python lets you wake up to custom sounds, personalized messages, and the satisfaction of coding your own mornings.
But you’re not done yet! This is just the foundation. Think about adding features like snooze options or a list of predefined alarm messages. The possibilities are endless! Experiment, customize, and make your Python alarm clock truly your own. Wake up every morning feeling accomplished, knowing you conquered both your day and your code.
Ready for More Python Tkinter Adventures?
- Meditation App in Python: Helps to Practice Deep Breathing
- Test Your Typing Speed with Python – Tkinter Project
- Create a Multiple Files Renamer in Python with Tkinter
If you have any burning questions about this topic, feel free to drop them in the comments section.
Happy Coding!