![]()
Introduction
In this digital era, online platforms have become an essential part of our lives. Whether it is social media, online shopping, or banking, most activities are carried out through websites or mobile applications. To access these platforms, users need to authenticate their identity through a login and registration process. In this tutorial, we will develop a login and registration form in Python using Tkinter and MySQL database.
To enhance the visual appeal of this project, we will utilize the Python Tkinter library. The login and registration system we are creating will handle the following tasks:
- Register a new user to the system.
- Authenticate an existing user through the login form.
The Project Details
The graphical interface of this project is managed by the Tkinter library. The PyMySQL package is used here to manage database operations using Python.
The project folder contains one folder, named Images and three Python files, login_page.py, signup_page.py, and credentials.py. Within the Images folder, there are two images utilized in this project.
The names of the initial two Python files indicate their respective purposes. credentials.py includes the login information required for accessing the MySQL server.
As we’ll be interacting with the database, it’s essential to have MySQL Server installed on your system (You can find instructions on how to install MySQL on Windows, Linux, and Mac). If you’ve already completed this step, there’s no need to do it again.
Create a Database and a Table
Create a Database with this name: “student_database“.
create database student_database;Create the table “student_register” under the “student_database” database.
create table student_register(
   f_name VARCHAR(50) NOT NULL,
   l_name VARCHAR(50) NOT NULL,
   email VARCHAR(100) NOT NULL,
   question VARCHAR(50) NOT NULL,
   answer VARCHAR(100) NOT NULL,
   password VARCHAR(50) NOT NULL,
   PRIMARY KEY ( email )
);
Create a Dedicated MySQL User and Grant Privileges
I suggest to create a specific MySQL user exclusively for this project and grant the necessary privileges. Please perform the following steps:
1. Log in to MySQL:
You’ll need to have administrative access to your MySQL server. You can log in using the MySQL command-line client:
mysql -u root -pReplace root with your MySQL username if it’s different, and you’ll be prompted for the MySQL root password.
2. Create a New User:
To create a new MySQL user, you can use the `CREATE USER` command. Replace `username` and `password` with your desired username and password:
CREATE USER 'username'@'localhost' IDENTIFIED BY 'password';This creates a user called `username` that can only connect from the local machine. If you want to allow connections from any host, replace `localhost` with `%`.
3. Grant Privileges:
You can use the `GRANT` statement to assign privileges to the user. Here’s how to grant various privileges:
Grant all privileges on a specific database:
GRANT ALL PRIVILEGES ON database_name.* TO 'username'@'localhost';Grant specific privileges (e.g., GRANT CREATE, ALTER, DROP, INSERT, UPDATE, INDEX, DELETE, SELECT, REFERENCES, RELOAD) on a specific database:
GRANT SELECT, INSERT, UPDATE, DELETE ON database_name.* TO 'username'@'localhost';Replace `database_name` with the name of the database you want to grant access to.
Grant all privileges on all databases (not recommended for security reasons):
GRANT ALL PRIVILEGES ON *.* TO 'username'@'localhost';4. Apply Privileges:
After granting privileges, you need to apply the changes using the FLUSH PRIVILEGES command:
FLUSH PRIVILEGES;5. Exit MySQL:
Now you can exit the MySQL Client:
exit;Requirements and Installation
Make sure that you have Python installed on your system. You will also need to install PyMySQL library for connecting to and interacting with MySQL databases.
pip install PyMySQLNote that, by default Tkinter comes with most Python installations, so you likely won’t need to install it separately. However, if you don’t have it, you can install it using pip:
pip install tkWhat can you learn from this project?
- Creating a graphical interface with Tkinter: Creating Tkinter windows, frames, labels, input widgets, buttons, etc.
- Connecting Python to MySQL: How to Connect Python to MySQL.
- Database operations in Python: Access data from a table, update and delete operations, etc.
- Creating multiple Python modules to manage several tasks.
- Object Orient Programming in Python: Using classes, objects, etc.
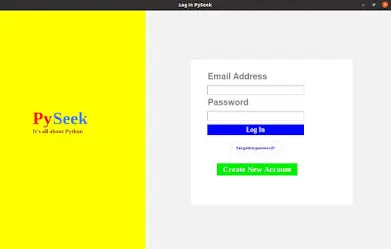
Output of the Login and Registration System
Be sure to watch the complete video to understand how this login and registration System operates.
Download the Source Code
Download the project files through the Download button below. The files will be in a zip format, and you’ll need to extract them to access the primary program files.
Summary
In this tutorial, our topic of discussion was a Login and Registration Portal using Python and MySQL database in the backend. The graphical interface of this project is managed by Tkinter Library.
You need to follow some basic things before using this login and registration system. For example, Installing MySQL server and all required modules or packages, creating a database and a table, etc.
The code is not suitable for copying and pasting because of its length. Therefore, I’ve provided the Project files in a zip format above, which you can download using the ‘Download’ button.
Find more projects related to Python and MySQL here:
👉Student Management System Project in Python with MySQL
👉Library Management System Project in Python with MySQL
👉Contact Management System Project in Python with MySQL
Do you have any queries about this Python project? Drop them in the comments below, and I’ve got your back! Let’s navigate through your questions together.
Happy Coding!